seat Workshop Repair Guides

SEAT Workshop Service and Repair Manuals

Valve control|Valves > < Renewing valve stem seals with cylinder head installed
Valve stem oil seals with cylinder head removed: replace
Consult the equivalence table for tools and equipment according to applicability among Seat / VW / Audi / Skoda → Chapter.
   
Special tools and workshop equipment required
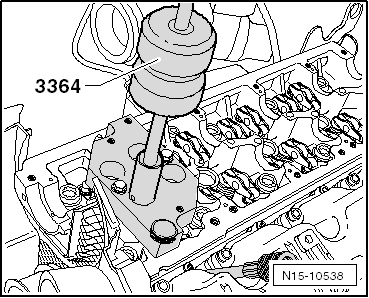
t  Valve stem seal extractor -3364-, see equivalent → Anchor
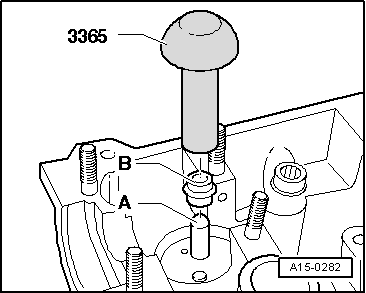
t  Tool for inserting seals onto the valve stems -3365-, see equivalent → Anchor
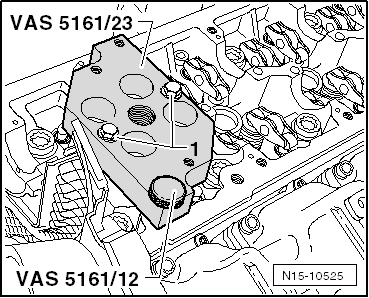
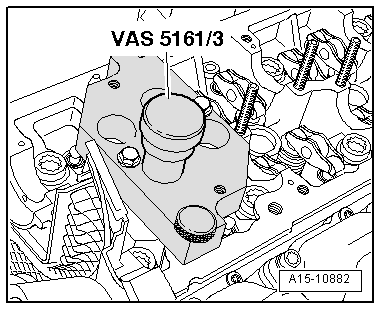
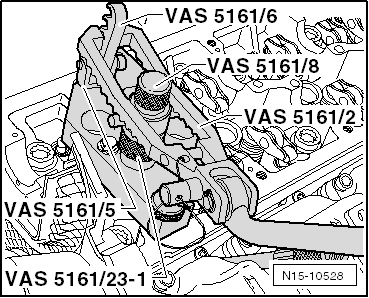
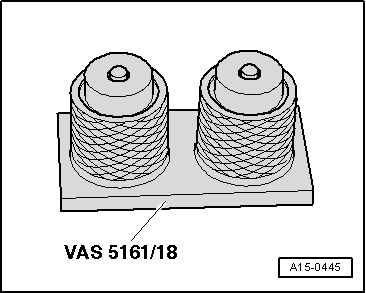
t  Removal / installing device for valve cotters -VAS 5161- with guide plate -VAS 5161/23- and knurled spacer ring -VAS 5161/23-1-, see equivalent → Anchor
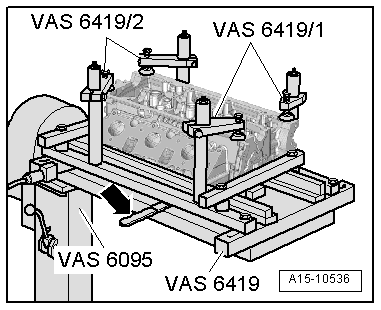
t  Engine and gearbox support -VAS 6095-, see equivalent → Anchor
t  Cylinder head clamping device -VAS 6419-, see equivalent → Anchor
t  2x M6x30 bolts

Operation process
–  Remove camshafts → Chapter.
–  Mark allocation of roller rocker fingers and hydraulic compensation elements for reinstallation.
–  Remove roller rocker fingers together with hydraulic compensation elements and place down on a clean surface.
–  Insert cylinder head tensioning device -VAS 6419- into engine and gearbox support -VAS 6095-.
   
–  Tension cylinder head on cylinder head tensioning device as shown in illustration.
–  Connect cylinder head clamping device to compressed air.
–  Use lever -arrow- to slide air cushion under combustion chamber from which valve stem seal is to be removed.
–  Allow compressed air to flow into air cushion until it lies against valve disc.
  A15-10536
–  Place guide plate -VAS 5161/23- onto cylinder head.
–  Secure guide plate on intake manifold side with knurled screw -VAS 5161/12- and 2 screws, M6 x 30 -Pos. 1- by hand until they make contact.
  N15-10525
–  Insert drift -VAS 5161/3- into guide plate and use a plastic hammer to knock loose the firmly seated valve cotters.
  A15-10882
–  Screw toothed piece -VAS 5161/6- with hooking fork -VAS 5161/5- into guide plate.
–  Push sleeve -VAS 5161/23-1- onto assembly cartridge -VAS 5161/8-.
–  Attach pressure fork -VAS 5161/2- to toothed piece and press assembly cartridge down.
–  At the same time, turn knurled screw of assembly cartridge clockwise until tips engage in valve cotters.
–  Move knurled screw back and forth to press apart valve cotters and capture them in assembly cartridge.
–  Release the pressure prong.
–  Remove assembly cartridge with knurled spacer ring.
–  Remove valve spring and valve spring plate.
  N15-10528
–  Pull off valve stem seal using valve stem seal puller -3364-.
  N15-10538
  Caution
Risk of damage when installing valve stem seals.
Place plastic sleeve -A-, enclosed with new valve stem seals -B-, onto valve stem.
–  Lightly oil sealing lip of valve stem seal.
–  Slip valve stem oil seal over plastic sleeve.
–  Carefully press valve stem seal onto valve guide using valve stem seal fitting tool -3365-.
–  Remove plastic sleeve.
  A15-0282
If the valve cotters have been removed from the assembly cartridge, they must first be inserted into the valve insertion device -VAS 5161/18-.
l  Larger diameter of valve cotters faces upwards.
–  Insert valve spring and valve spring plate.
–  Press assembly cartridge onto valve cotter insertion device from above and pick up valve cotters.
  A15-0445
–  Insert assembly cartridge into guide plate -VAS 5161/23- again.
–  Press the pressure fork together and pull upwards towards the knurled screw and at the same time turn towards the left and right. The valve cones are mounted in this way.
–  Reduce pressure on pressure fork whilst pulling on knurled screw.
–  Repeat procedure on each valve.
Reassembly
Installation is carried out in reverse order, noting the following:
–  Ensure that all roller rocker fingers contact valve stem ends correctly and are clipped into relevant hydraulic compensation elements.
–  Install camshafts → Chapter.
  N15-10528

Valve control|Valves > < Renewing valve stem seals with cylinder head installed