
Leon Mk1
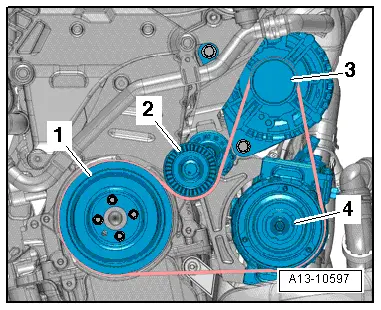
| Assembly overview - poly V-belt drive |

| 1 - | Poly-V belt |
| q | Mark direction of rotation with chalk or felt pen before removing |
| q | Check for wear |
| q | Do not bend |
| q | removing and fitting → Chapter |
| q | Distance → Fig. |
| q | When installing, make sure it is properly seated on the pulleys. |
| 2 - | Special bolt -10 Nm + 90° (1/4 turn) |
| q | Replace |
| q | Use only genuine bolt → Parts catalogue |
| 3 - | Vibration damper |
| q | With pulley for poly V-belt |
| q | Installation position: Hole in vibration damper must be positioned above the raised section of the crankshaft gear wheel |
| q | removing and fitting → Chapter |
| 4 - | Poly V-belt tensioning element |
| q | removing and fitting → Chapter |
| 5 - | Dowel sleeves |
| q | Ensure correct seating in bracket for ancillaries |
| 6 - | 25 Nm |
| 7 - | Bracket for ancillary mechanical units |
| q | removing and fitting → Chapter |
| 8 - | 23 Nm |
| 9 - | Bolt. |
| q | Tightening torque and sequence → Anchor |
| 10 - | Alternator |
| q | removing and fitting → Rep. gr.27 |
| 11 - | 25 Nm |
| 12 - | Air conditioning compressor |
| q | removing and fitting → Rep. gr.87 |
| 13 - | 45 Nm |
| 14 - | Dowel sleeves |
| q | Ensure correct seating in bracket for ancillaries |
|
|