
Leon Mk1
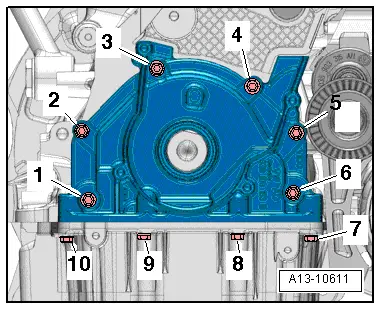
| Sealing flange on the pulley side: Assembly overview |

| 1 - | 120 Nm and then turn 90° further |
| q | Replace |
| q | Use counterhold tool -3415- to loosen and tighten. |
| q | Do not additionally oil or grease thread and shoulder. |
| q | Turning further can be done in several stages. |
| 2 - | Crankshaft cogwheel |
| q | Contact surface between toothed belt pulley and crankshaft must be free from oil. |
| q | Can only be fitted in one position |
| 3 - | Seal |
| q | Do not additionally oil or grease the oil seal sealing lip. |
| q | Before the installation, clean the remains of oil on the crankshaft journal using a clean cloth. |
| q | Renewing crankshaft oil seal on pulley end → Chapter |
| 4 - | Sealing flange |
| q | Must seat on dowel pins. |
| q | removing and fitting → Chapter |
| q | Install with silicone sealant -D 176 404 A2- → Chapter. |
| 5 - | cylinder block |
| q | Removing and installing crankshaft → Chapter. |
| q | Dismantling and assembling pistons and conrods → Chapter |
| 6 - | Locking pin |
| q | 2 off |
| 7 - | Bolt. |
| q | Specified torques and installation sequence → Fig.. |
|
|
| stage: | Bolts | Tightening torque |
| 1. | -1 … 10- | Screw in to contact by hand. |
| 2. | -1 … 6- | In diagonal sequence and in stages; final torque 15 Nm |
| 3. | -7 … 10- | 15 Nm |