seat Workshop Repair Guides

SEAT Workshop Service and Repair Manuals

Removing and installing sealing flange - pulley end > < Sealing flange on the pulley side: Assembly overview
Crankshaft oil seal- pulley side: replace
t  Crankshaft oil seal, pulley end: Removing → Anchor
t  Crankshaft oil seal, pulley end: Fitting → Anchor
   
Consult the equivalence table for tools and equipment according to applicability among Seat / VW / Audi / Skoda → Chapter.
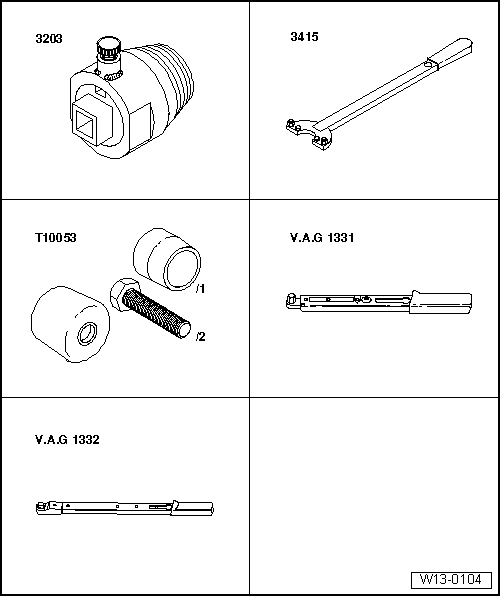
Special tools and workshop equipment required
t  Seal extractor -3203-, see equivalent → Anchor
t  Hose clamp -3415-, see equivalent → Anchor
t  Mounting tool -T10053-, see equivalent → Anchor
t  Torque wrench (5 - 50 Nm) -V.A.G 1331-, see equivalent → Anchor
t  Torque wrench (40 - 200 Nm) -V.A.G 1332-, see equivalent → Anchor
Removing
l  Engine installed.
–  Take off toothed belt. → Chapter
  W13-0104
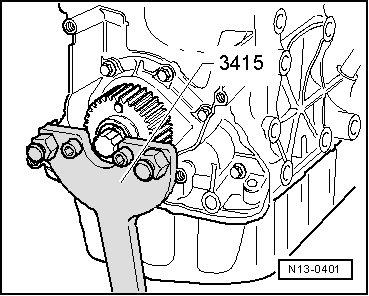
–  Remove gear wheel from the camshaft. Immobilise the gear wheel using the counterhold -3415-.
  N13-0401
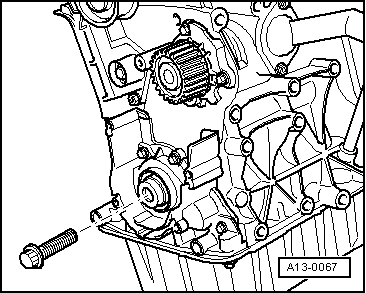
–  To guide oil seal extractor -3203-, screw central bolt into crankshaft onto stop by hand.
–  Unscrew inner part of oil seal extractor 2 turns (approx. 3 mm) out of outer part and lock with knurled screw.
–  Oil threaded head of oil seal extractor.
  A13-0067
–  Using great pressure, screw oil seal extractor as far as possible into seal.
–  Loosen knurled screw and turn inner part against crankshaft until oil seal is pulled out.
–  Clamp flats of oil seal extractor in vice and use pliers to remove oil seal.
Installing
  Note
The oil seal sealing lip must not be additionally oiled or greased.
–  Unscrew the middle bolt of the crankshaft.
–  Clean contact surface and sealing surface for oil seal.
–  Remove oil residue from crankshaft journal using clean cloth.
  A13-0060
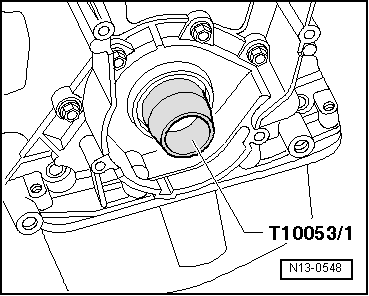
–  Place guide sleeve -T10053/1- onto crankshaft journal.
–  Slide the dry seal onto the guide sleeve up to the crankshaft journal.
  N13-0548
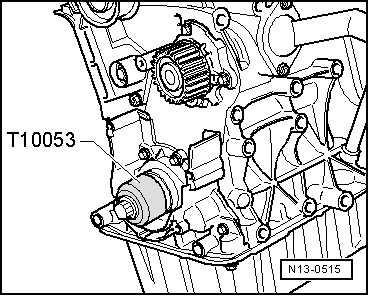
–  Fit the seal into position with the fitting device -T10053- and the both -T10053/2- (M16 x 1.5 x 60).
  Note
t  There should be no oil on the contact surface between the notched pulley, the diamond-coated washer and the crankshaft.
t  Replace the centre bolt.
t  The thread and collar must be free of oil and grease.
  N13-0515
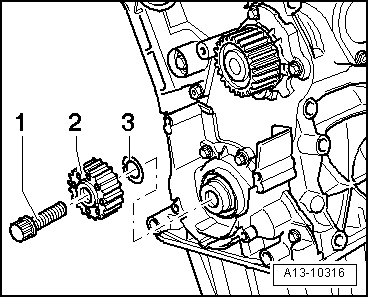
–  Fit the notched pulley -2- with a diamond-coated washer -3- and tighten the bolt by hand -1-.
  A13-10316
–  Immobilise the gear wheel using the counterhold tool -3415-.
–  Tighten the new screw to 120 Nm + 1/4 turns (90°) using a spanner. Turning further can be done in several stages.
Further assembly is basically the reverse of the dismantling sequence. Note the following:
–  Install toothed belt (adjust valve timing) → Chapter.
–  Install vibration damper → Chapter.
–  Install poly V-belt → Chapter.
  N13-0401

Removing and installing sealing flange - pulley end > < Sealing flange on the pulley side: Assembly overview