
Leon Mk1
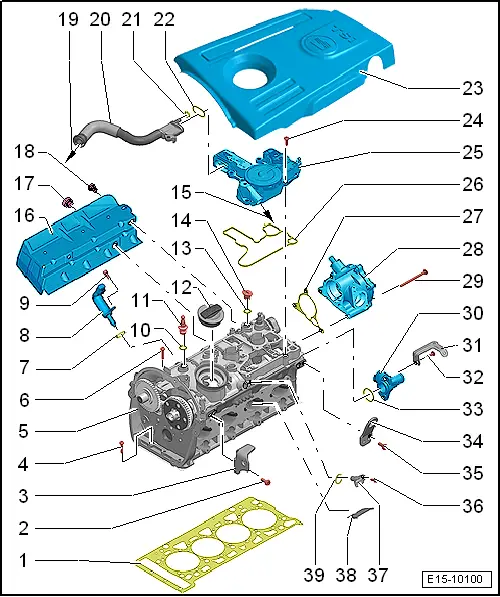
| 1 - | Cylinder head gasket |
| q | Replace |
| q | Note the fitting position: The part number should point to the cylinder head |
| 2 - | Bolt. |
| q | 25 Nm |
| 3 - | Transport plate |
| 4 - | Bolt. |
| q | Tighten in 2 stages: |
| 1. | Tighten to 8 Nm |
| 2. | Use rigid wrench to turn 90° further. |
| 5 - | Cylinder head |
| q | Removing and installing |
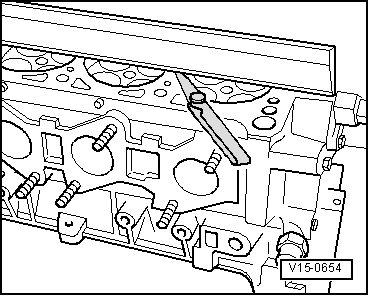
| q | Check for deformations → Fig. |
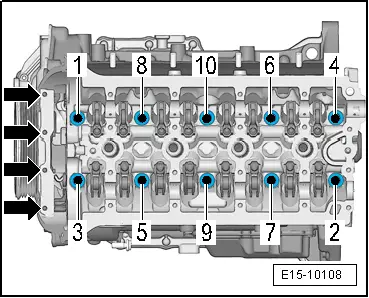
| 6 - | Cylinder head bolt |
| q | Replace |
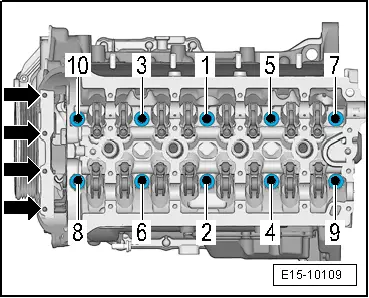
| q | Note procedure when loosening → Fig. |
| q | Note procedure when tightening → Fig. |
| q | Tighten in 3 stages: |
| 1. | Tighten to 40 Nm |
| 2. | Use rigid wrench to turn 90° further. |
| 3. | Use rigid wrench to turn 90° further. |
| 7 - | O ring |
| q | Replace |
| q | Lubricate with engine oil |
| 8 - | Actuator for variable valve timing |
| 9 - | Bolt. |
| q | 5 Nm |
| 10 - | O ring |
| q | Replace |
| q | Lubricate with engine oil |
| 11 - | Sealing plug |
| q | 5 Nm |
| q | With ball head for engine cover panel |
| 12 - | Sealing plug |
| q | With gasket |
| 13 - | O ring |
| q | Replace |
| q | Lubricate with engine oil |
| 14 - | Sealing plug |
| 15 - | To intake manifold |
| 16 - | Heat shield |
| 17 - | Bolt. |
| q | 20 Nm |
| 18 - | Bolt. |
| q | 20 Nm |
| 19 - | To intake manifold/turbocharger |
| 20 - | Breather line |
| 21 - | O ring |
| q | Not available as a separate replacement part |
| 22 - | Seal |
| q | Not available as a separate replacement part |
| 23 - | Engine cover panel |
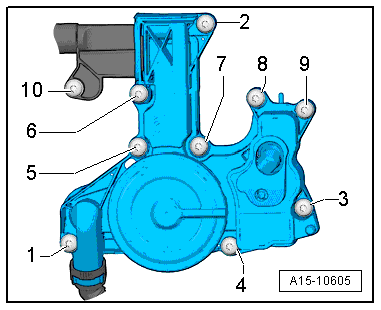
| 24 - | Bolt. |
| q | Tightening sequence → Fig. |
| 25 - | Crankcase breather |
| 26 - | Seal |
| q | Not available as a separate replacement part |
| 27 - | Seal |
| q | If this is damaged, replace it |
| 28 - | Vacuum pump |
| q | removing and fitting → Rep. gr.47 |
| 29 - | Bolt. |
| q | Tightening torque → Rep. gr.47 |
| 30 - | Connecting nipple |
| 31 - | Bracket |
| 32 - | Bolt. |
| q | 9 Nm |
| 33 - | O ring |
| q | Replace |
| q | Lubricate with coolant |
| 34 - | Transport plate |
| 35 - | Bolt. |
| q | 25 Nm |
| 36 - | Bolt. |
| q | 9 Nm |
| 37 - | Hall sender -G40- |
| 38 - | Separating plate |
| 39 - | O ring |
| q | Replace |
| q | Lubricate with engine oil |
 Note
Note
|
|
|
|
|
|
|
|