
Leon Mk1
| Silencer: Component overview (CDND) |

| 1 - | Seal |
| q | Replace |
| 2 - | Lambda probe -G39- and Lambda probe heater -Z19- |
| q | The threads on the new Lambda probes are coated with a special assembly paste. |
| q | If re-installing old Lambda probe, coat thread with high-temperature paste: Refer to → Electronic parts catalogue for high-temperature paste |
| q | The assembly paste/high-temperature paste must not get into the slots on the probe body |
| q | removing and fitting → Chapter |
| 3 - | Lambda probe, after catalytic converter -G130- and Lambda probe heater 1, after catalytic converter -Z29- |
| q | The threads on the new Lambda probes are coated with a special assembly paste. |
| q | If re-installing old Lambda probe, coat thread with high-temperature paste: Refer to → Electronic parts catalogue for high-temperature paste |
| q | The assembly paste/high-temperature paste must not get into the slots on the probe body |
| q | removing and fitting → Chapter |
| 4 - | Oxidizing catalytic converter |
| q | Protect catalytic converter from damage by knocks and impact |
| q | Removing and installing → Chapter |
| q | Align exhaust system so it is free of stress → Chapter. |
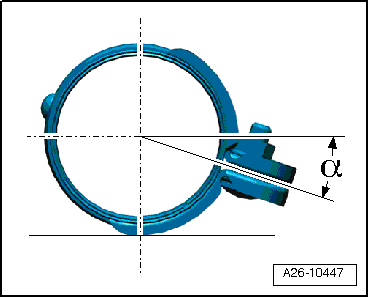
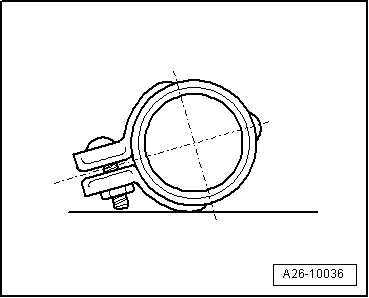
| 5 - | Clamp (front) |
| q | Before tightening, align exhaust system so it is free of stress → Chapter |
| q | Installation position → Fig. |
| q | Tighten bolted connections evenly. |
| 6 - | Nut |
| q | 23 Nm |
| 7 - | Centre bracket |
| q | If this is damaged, replace it |
| q | Check preload → Chapter |
| 8 - | Bracket (rear) |
| q | If this is damaged, replace it |
| q | Check preload → Chapter |
| 9 - | Nut |
| q | Replace |
| q | 23 Nm |
| 10 - | Middle silencer |
| q | Combined in one unit with rear silencers as original equipment. Can be renewed individually for repair purposes |
| q | Cutting point → Chapter |
| q | Align exhaust system so it is free of stress → Chapter. |
| 11 - | Nut |
| q | Replace |
| q | 23 Nm |
| 12 - | Bolt. |
| q | Replace |
| q | 23 Nm |
| 13 - | Centre bracket |
| q | If this is damaged, replace it |
| q | Check preload → Chapter |
| 14 - | Nut |
| q | 40 Nm |
| q | Replace |
| q | Coat the studs of the turbocharger with high-temperature paste. |
| q | High-temperature paste → Electronic parts catalogue |
|
|
|
|