seat Workshop Repair Guides

SEAT Workshop Service and Repair Manuals

Engine cooling > < Removing and installing oil pressure switch for reduced oil pressureF378
Oil pressure and oil pressure switch: checking
   
Oil pressure and oil pressure switch: checking
Special tools and workshop equipment required
t  Oil pressure tester -V.A.G 1342-, see equivalent → Anchor
t  Tension tester -V.A.G 1527 B-, see equivalent → Anchor
t  Auxiliary measuring tool -V.A.G 1594C-, see equivalent → Anchor

Test requirements
l  Engine oil level: check correct condition → Fig.
l  Engine oil temperature at least 80°C (radiator fan must have run once).
  Note
Checking operation of and servicing visual and acoustic oil pressure gauge Current flow diagrams, → Vehicle diagnostic tester„Functional and component selection“.
Checking sequence
   
–  Remove the purging line -1-, disengage the activated carbon vessel -A- and remove upwards -B-. Move the activated carbon vessel to one side.
  Note
Place a cloth underneath bracket for ancillaries to catch any escaping oil.
  N13-10335
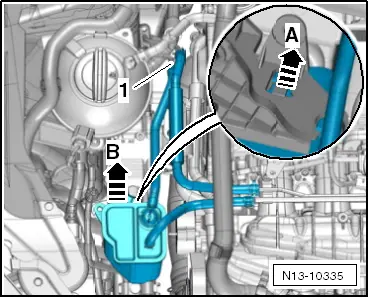
–  Unplug electrical connector -2- at oil pressure switch for reduced oil pressure -F378-.
–  Unscrew oil pressure switch for reduced oil pressure -F378--1-.
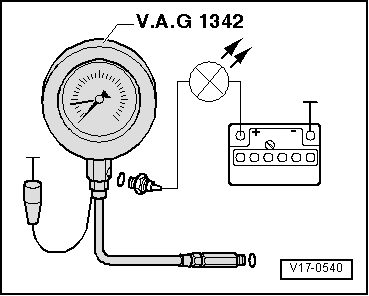
–  Screw oil pressure tester -V.A.G 1342- into oil filter bracket in place of oil pressure switch.
–  Screw in the oil pressure switch for reduced oil pressure -F378- into the pressure gauge -V.A.G 1342-.
–  Start the engine.
l  Oil pressure at engine idle: min. 1,2 ... 2.1 bar
l  Oil pressure at 2,000 rpm: 1,6 ... 2.1 bar
l  Oil pressure at 3,700 rpm: 3,0 ... 4.0 bar
  Note
During the first 1000 km, the oil pressure at 2000 rpm can be between 3.0 and 4.0 bar.
If the specifications are not met:
–  Check if the strainer in the oil suction pipe is dirty → Item.
–  Check using the valve for oil pressure control -N428- → Vehicle diagnostic tester
  Note
Insufficient oil pressure may also be caused by mechanical faults, e.g. damaged bearings.
If a fault is found:
–  Renew oil pump → Chapter.
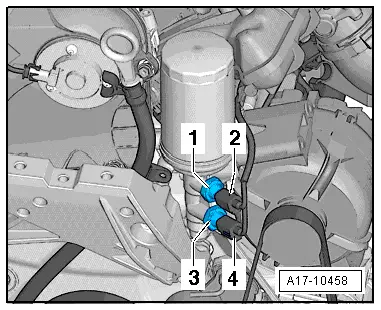
Check the Oil pressure switch for reduced oil pressure -F378- (brown):
–  Switch off the engine.
  A17-10458
–  Connect brown wire of tester to earth (-).
–  Connect the voltage tester -V.A.G 1527B- with the auxiliary cables of the auxiliary measurement set -V.A.G 1594C- to the battery positive (+) and the oil pressure switch for reduced oil pressure -F378- (brown).
l  LED should not light up.
–  Replace the oil pressure switch for reduced oil pressure -F378- when the LED illuminates.
If LED does not light up:
–  Start the engine. The LED must light-up when an overpressure of 0.55 - 0.85 bar occurs, otherwise replace the oil pressure switch.
Check the oil pressure switch -F22- (blue):
–  Switch off the engine.
–  Connect the voltage tester -V.A.G 1527B- to the battery plus (+) using the auxiliary cable from the auxiliary cable kit -V.A.G 1594C- and connect to the oil pressure switch -F22-.
l  LED should not light up.
–  If the LED lights up, replace oil pressure switch -F22-.
If LED does not light up:
–  Start engine and increase engine speed: The LED must light-up between 2.15 and 2.95 bar. If this is not the case, replace the oil pressure switch.
l  Tightening torques → Chapter
–  Install oil pressure switch.
  V17-0540

Engine cooling > < Removing and installing oil pressure switch for reduced oil pressureF378