
Leon Mk1
| Part II: |

| 1 - | Seal |
| q | Renew |
| 2 - | Retainer |
| 3 - | 20 Nm |
| 4 - | Turbocharger with exhaust manifold |
| q | With the charge pressure actuator -V465- |
 Note
Note| The turbocharger can only be replaced completely with the exhaust manifold and the charge pressure actuator -V465-. |
| q | Removing and installing → Chapter |
| 5 - | O ring |
| q | Renew |
| 6 - | Oil return pipe |
| 7 - | 8 Nm |
| 8 - | 10 Nm |
| 9 - | Heat shield |
| 10 - | 8 Nm |
| 11 - | Coolant tubes |
| 12 - | 8 Nm |
| 13 - | 18 Nm |
| q | Coat threaded pins with high-temperature paste; for high-temperature paste refer to → Electronic parts catalogue |
| q | Tightening torque and sequence → Fig. |
| 14 - | Seal |
| q | Renew |
| 15 - | Banjo bolt |
| q | Tightening torque: 20 Nm |
| 16 - | Oil supply pipe |
| 17 - | O ring |
| q | Renew |
| 18 - | 8 Nm |
Note
|
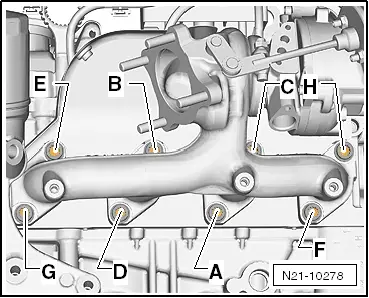
|
| stage: | Nuts | Tightening torque |
| 1. | -A … H- | Screw in by hand until it stops. |
| 2. | -A … H- | 18 Nm |
| 3. | -A … H- | Tighten to 12 Nm |
| 4. | -A … H- | Tighten to 12 Nm |
Note
|