
Leon Mk1
| Part I Poly V-belt drive - Assembly overview |
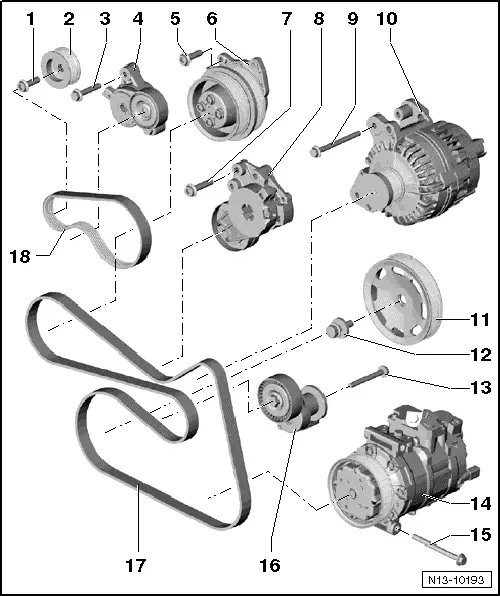
| 1 - | 40 Nm + 1/4 turn (90°) further |
| q | The compressor shaft must be counter-held using a 16 mm spanner for loosening and tightening the fixing screws |
| q | Replace |
| 2 - | Pulley |
| q | For supercharger. |
| 3 - | 23 Nm |
| 4 - | Tensioner |
| q | For the ribbed belt of the compressor. |
| q | Loosen with the 16 mm spanner |
| q | Lock with counterhold -T10060A-. |
| 5 - | 8 Nm |
| 6 - | Coolant pump with magnetic clutch for supercharger -N421- |
| q | removing and fitting → Chapter |
| 7 - | 23 Nm |
| 8 - | Tensioner |
| q | For poly V-belt. |
| q | Release using an SW 16 spanner -T10447- |
| q | Lock with counterhold -T10060A-. |
| 9 - | 23 Nm |
| 10 - | Alternator |
| 11 - | Pulley |
| q | For crankshaft |
| q | Contact surfaces must be free of oil and grease. |
| 12 - | Locating bolt |
| q | Removing and installing crankshaft pulley → Chapter. |
| q | Replace |
| q | Contact surface for securing bolt must be free of oil and grease. |
| q | Oil threads before inserting. |
| q | Secure belt pulley against turning with counterhold -3415-. |
| q | Turning further can be done in several stages. |
| 13 - | 20 Nm + 1/4 turn (90°) further |
| q | Removing and installing with vehicle raised. |
| q | Replace |
| 14 - | Air conditioning compressor |
| 15 - | 25 Nm |
| 16 - | Tensioner |
| q | For poly V-belt. |
| q | Release using a spanner |
| q | Lock with a 4 mm Allen key |
| 17 - | Poly-V belt |
| q | Mark direction of rotation before removing |
| q | Poly-V belt: removing and installing → Chapter |
| 18 - | Poly-V belt |
| q | For supercharger. |
| q | Mark direction of rotation before removing |