seat Workshop Repair Guides

SEAT Workshop Service and Repair Manuals

Enginecrankshaft group, pistons > < Mechanical groups support: Tightening torques
Mechanical groups support: verification and adjustment
t  Check the assembly mounting → Anchor
t  Adjust the assembly mounting → Anchor
Assembly mounting: checking
Special tools and workshop equipment required
   
t  Retainer -U-30025F-
  L00-10308
Checking sequence
–  Detach engine cover -arrows- (according to version).
  A10-1564
–  Take the active carbon filter out upwards with connected hoses and place to side.
  A10-1581
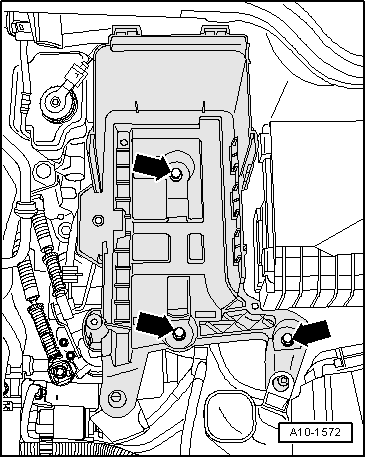
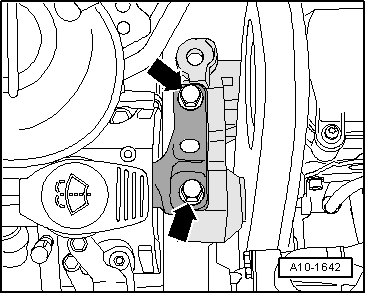
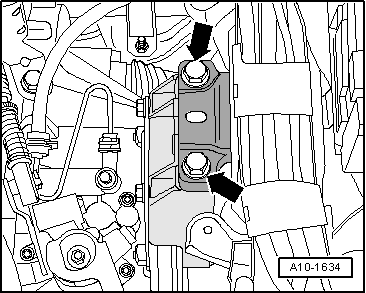
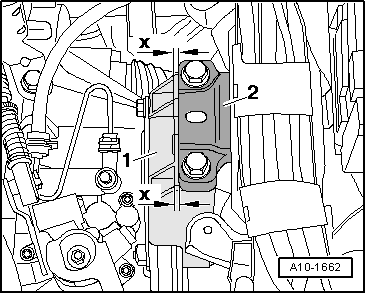
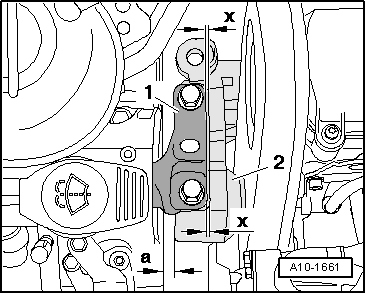
The following dimensions must be reached:
t  Between the engine support and the right longitudinal member there must be a distance of -a- = 16 mm.
t  The moulded edge at the engine support foot -2- must be parallel to the support arm -1- (dimension-x- = dimension-x-).
  Note
t  The dimension -a- = 16 mm. can be checked, for example, with an appropriate cylindrical object.
t  If the gap is too narrow or too wide, settings must be carried out → Anchor.
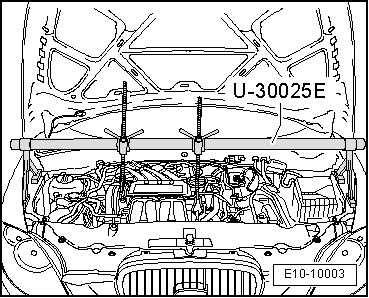
Assembly mounting: adjusting
Special tools and workshop equipment required
  A10-1661
t  attachment tool -T20174-
  W00-2456
t  Retainer -U-30025F-
  L00-10308
Operation process
–  Detach engine cover -arrows- (according to version).
  A10-1564
–  Take the active carbon filter out upwards with connected hoses and place to side.
  A10-1581
–  Pull off the hoses -1- and -2- on air filter housing.
–  Remove bolt -3-.
–  Take out air cleaner housing.
–  Remove battery → Electrical system; Rep. gr.27.
  A10-1570
–  Remove the battery tray -arrows-.
–  Detach battery tray from air duct at front.
  A10-1572
–  Fit the engine and gearbox support -U-30025F- on wing panel flanges. Spindles face to the front.
–  Engage the trigger snaps of the spindles on the lifting eyes.
–  Take up weight of engine evenly with both spindles (but do not raise engine).
  E10-10003
–  Release the securing bolts -arrows- of the engine assembly, engine side.
  A10-1642
–  Release the securing bolts -arrows- of the engine assembly, gearbox side.
–  Renew all 4 bolts one after another (if they have not already been removed when the engine was installed) and screw them in by hand.
  A10-1634
–  Move the engine between engine console -1- and support arm -2- using a fitting bar until the following dimensions are reached:
t  Between the engine support and the right longitudinal member there must be a distance of -a- = 16 mm.
t  The moulded edge at the engine support foot -2- must be parallel to the support arm -1- (dimension-x- = dimension-x-).
  Note
The dimension -a- = 16 mm. can be checked, for example, with an appropriate cylindrical object.
–  Tighten the assembly support securing bolts, engine side → Chapter .
  A10-1661
–  Ensure that on the gearbox side that the edges of the support arm -2- and the gearbox console -1- are parallel (dimension -x- = dimension -x-).
–  Tighten the engine assembly support securing bolts, gearbox side → Chapter .
Installation is carried out in the reverse order of removal while noting the following:
–  Fit the battery → Electrical system; Rep. gr.27.
  A10-1662

Enginecrankshaft group, pistons > < Mechanical groups support: Tightening torques