
Leon Mk1
|
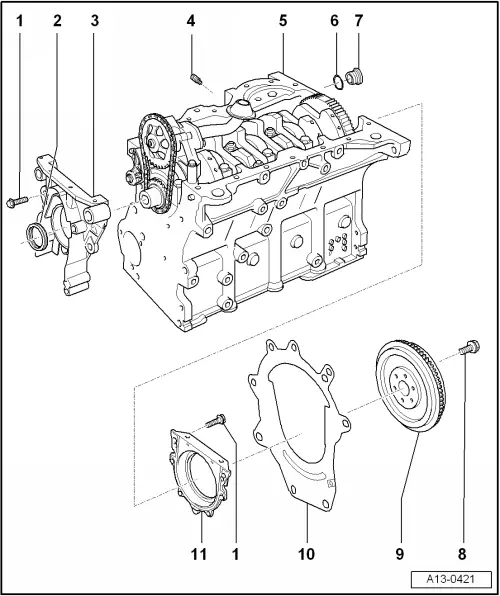
| 1 - | 15 Nm |
| 2 - | Seal |
| q | PTFE seal: Identification, without interior spring |
| q | Renew → Chapter |
| q | Do not grease or oil the seal lip of the seal |
| 3 - | Front sealing flange: |
| q | Must be housed correctly in the dowel sleeves for adjusting |
| q | Removing and fitting → Chapter |
| 4 - | Threaded pin, 10 Nm |
| q | Fit with thread locking agent → ETKA (electronic parts catalogue) |
| 5 - | cylinder block |
| q | Crankshaft - Components overview → Chapter |
| q | Piston and conrod - Components overview → Chapter |
| q | Lubrication system - General components overview → Chapter |
| 6 - | Seal |
| q | Renew |
| 7 - | Locking nut, 100 Nm |
| 8 - | 60 Nm + 1/4 turn (90°) further |
| q | Renew |
| 9 - | Flywheel |
| q | Removing and fitting → Chapter |
| q | Fitting is only possible in one position - holes offset- |
| 10 - | Intermediate plate |
| q | Must be housed correctly in the dowel sleeves for adjusting |
| q | Do not damage/bend when assembling |
| q | Is suspended on the gasket → Fig. |
| 11 - | Rear sealing flange with seal |
| q | Renew complete only. |
| q | Removing and fitting → Chapter |
| q | For installation, use the guide socket supplied for assembly or the guide socket -T20097- |
| q | Do not apply oil or grease to the seal |
| q | Before installing, remove oil residue from crankshaft journal using a clean cloth. |
| q | The guide sleeve should only be removed after fixing the sealing flange on the crankshaft journal |
|
|