seat Workshop Repair Guides

SEAT Workshop Service and Repair Manuals

Assembly mountings > < Attaching engine to repair stand
Engine: fitting
Engine: fitting
Fit the engine in the reverse order, paying attention to the following:
  Caution
When doing any repair work, especially in the engine compartment, pay attention to the following due to the cramped conditions:
t  All the various lines (e.g. fuel, hydraulic system, active carbon filter system, coolant, refrigerant, brake fluid and vacuum pipes and hoses) and electrical wiring must be installed in their original positions.
t  In order to avoid damage to the lines and cables, ensure sufficient clearance for all moving or hot components.
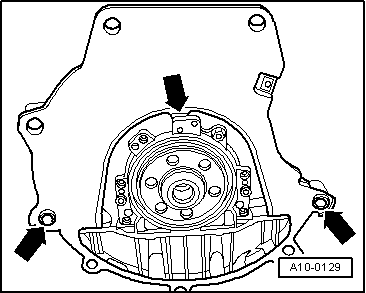
–  Use new dowel sleeves to centre the engine/gearbox assembly in the cylinder block.
   
–  Fit intermediate plate onto sealing flange and slide onto dowel sleeves -arrows -.
–  Lubricate the control camshaft gears slightly with lubricant -G 000 100-.
–  Check and install the clutch and clutch control → 5-speed manual gearbox 0AF; Rep. gr.30.
–  When mounting the engine / gearbox, ensure that there is sufficient free space in relation to the subframe as well as the radiator.
–  Align the engine position tension free by carrying out shaking moments or, if necessary, release the engine mount on the assembly.
–  Assemble the pendulum support.
  Note
t  Tightening torques for the assembly mounting → Chapter
t  Electrical connections and routing → Electrical system; Rep. gr.97.
–  Screw on the articulated shaft on the right and left sides to the gearbox → Running gear, shafts, steering; Rep. gr.40
–  Install the exhaust pipe → Chapter.
–  Fit the selector mechanism and adjust if necessary → 5 speed manual gearbox 0AF; Rep. gr.34.
–  Fit the slave cylinder of the hydraulic clutch → 5-speed manual gearbox 0AF; Rep. gr.30
–  Install the air conditioner compressor → Heating, ventilation, air conditioning; Rep. gr.87.
–  Install poly V-belt → Chapter.
–  Install the sound-proofing → Body, exterior assembly work; Rep. gr.50.
–  Fit the front plate of the plenum chamber → Bodywork, exterior fitting work; Rep. gr.55.
–  Place lock carrier into original position: → Bodywork, exterior fitting work; Rep. gr.50.
–  Connect the gas hose with the gas distribution rail and tighten the clamp to 3.5 Nm or mount a new clamp.
–  Fill coolant system with coolant → Chapter.
–  Connect battery → Electrical system; Rep. gr.27.
–  Connect the Vehicle diagnostic, testing and information system -VAS 5051B- as follows:
–  Read out and erase all fault memory that may have been registered as a result of the fitting.
–  Perform road test.
–  Perform a test drive of the vehicle and remedy all faults registered when at hand.
Tightening torques
  A10-0129
Bolt union Specified torque .
Bolts, nutsM 610 Nm
 M 820 Nm
 M 1045 Nm
 M 1260 Nm


Assembly mountings > < Attaching engine to repair stand