seat Workshop Repair Guides

SEAT Workshop Service and Repair Manuals

Removing, installing and tensioning toothed belts > < Removal:
Installing
Installing
  Note
t  No oil or coolant must be allowed to remain in the blind holes for the cylinder head bolts in the cylinder block.
t  Do not remove the new cylinder head gasket from its packing until immediately before its installation.
t  Handle the new gasket with extreme care. If damaged, leaks may result.
t  Renew cylinder head bolts.
–  Place a clean cloth in cylinders so that no dirt or particles can get in between cylinder wall and piston.
–  Also prevent dirt and particles from getting into the coolant.
–  Carefully clean cylinder head and cylinder block sealing surfaces. Ensure no long grooves or scratches are produced (if using sandpaper, it must be at least 100 grit).
–  Carefully remove any abrasive metal particles and then the cloths.
–  If the crankshaft has rotated: Position the cylinder number 1 into TDC and then rotate the crankshaft a little backwards.
   
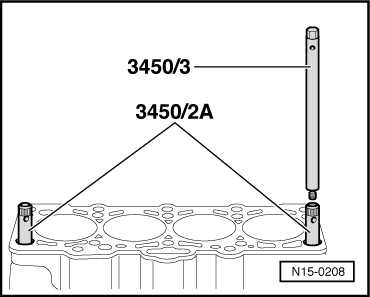
–  To centralise, screw guide pins -3450/2A- into the outer holes on the exhaust gas side.
–  Fit a new cylinder head gasket. The lettering (spare part no.) must be legible.
  Note
When fitting the cylinder head, the tensioning roller must rest on the threaded studs.
–  Position the cylinder head, fit the 8 remaining bolts and tighten by hand.
–  Unscrew the guide pins through the screw boreholes using the screw extractor -3450/3-. The screw extractor must be turned anti-clockwise for this purpose until the bolts are exposed.
–  Fit the remaining cylinder head bolts and tighten by hand.
  N15-0208
–  Tighten cylinder head bolts in tightening sequence as follows:
  V15-0738
stage:Tighten
1
–  Tighten to 40 Nm using a torque key.
2
–  Tighten a further 90° with a rigid wrench.
3
–  Tighten a further 90° with a rigid wrench.

  Note
When turning camshaft, crankshaft should not be at TDC. Danger of damage to the valves/piston base.
–  Install toothed belt and adjust the valve timing → Chapter.
–  Installing the Poly-V belt → Chapter.
Further assembly is basically the reverse of the dismantling sequence.
–  Filling with new coolant → Chapter.
   

Removing, installing and tensioning toothed belts > < Removal: