seat Workshop Repair Guides

SEAT Workshop Service and Repair Manuals

Needle bearing on the crankshaft: Pressing out and pressing in > < Crankshaft dimensions
Chain sprocket: removing and fitting
t  Removing → Anchor
t  Fitting → Anchor
Consult the equivalence table for tools and equipment according to applicability among Seat / VW / Audi / Skoda → Chapter.
   
Special tools and workshop equipment required
t  counterhold -T20178-, see equivalent → Anchor
t  Tappet -U-40002-, see equivalent → Anchor
t  Wrench -U-40090-, see equivalent → Anchor
t  Kit -U-40100B-, see equivalent → Anchor

Removing
–  Remove sealing flange (front) → Chapter.
–  Remove sump → Chapter.
–  Remove oil pump chain sprocket → Item, chain tensioner → Item and chain → Item.
   
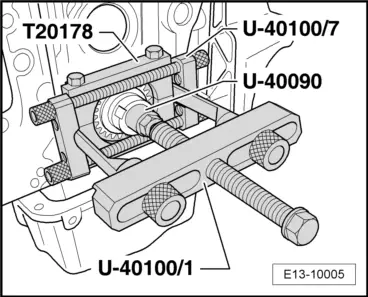
–  Remove the crank shaft gear with the extractor -T20178- and the Set -U-40100B- withAdapter -U-40100/PP- and use the key with the adapter off to protect the crankshaft pin key -U-40090-. Attach adapter -U-40100/7- as shown in illustration for safety and to achieve a compact unit.
Fitting
Installation is carried out in the reverse order of removing, when doing this note the following.
  WARNING
Protective gloves
–  Heat the chain sprocket in the oven for about 15 minutes at 220 ºC.
l  Fitting location: The wide edge of the sprocket points to the engine.
  E13-10005
–  Fit chain sprocket on end of crankshaft using pliers.
–  Fit chain sprocket on end of crankshaft using pliers and slide with fitting sleeve -U-40002- until fully seated on the crankshaft.
  E13-10009

Needle bearing on the crankshaft: Pressing out and pressing in > < Crankshaft dimensions