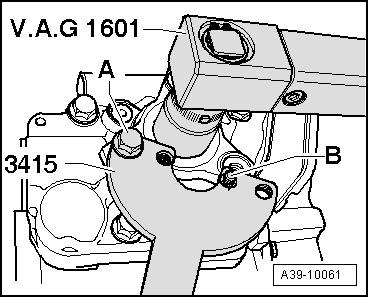
seat Workshop Repair Guides

SEAT Workshop Service and Repair Manuals

Electrical and electronic components and their location > < Detaching
Installing
Installing
–  Before fitting the new seal, lightly lubricate it around the outer diameter and between the sealing lips with high performance oil for Haldex clutches → Spare parts catalogue
   
–  Drive in new oil seal as far as stop using thrust piece -T10019-. Make sure seal remains straight.
  A39-10060
–  Drive in the cardan shaft flange with the fitting sleeve -30 20- in such a way that the marks -arrow- are in line.
  E39-10017
–  Install a new hexagonal nut with a fastener product → Spare parts catalogue and tighten it to the proper torque → Anchor.
A - Hexagonal bolts M10 x 20.
B - Hexagon socket bolt M8 x 15 (screwed from back side into counterhold -3415-).
–  Couple the cardan shaft rear part.
t  Propshaft, Altea XL 2009 ►, Altea XL Freetrack 2008 ►, Altea XL Freetrack 2009 ► → Chapter.
t  Alhambra 2011 ► → Chapter
–  Install the exhaust system and then align without tensioning → Rep. gr.26.
–  Checking oil level in Haldex coupling.
t  Oil level of Haldex coupling (2nd Generation), check and, top up where applicable, Altea XL 2009 ►, Altea XL Freetrack 2008 ►, Altea XL Freetrack 2009 ► → Chapter.
t  Check oil level in Haldex coupling (4th Generation), check and, top up where applicable, Altea XL 2009 ►, Altea XL Freetrack 2008 ►, Altea XL Freetrack 2009 ►, Alhambra 2011 ► → Chapter.
Tightening torque
  A39-10061
Component Nm
Flange for propshaft to rear final drive210


Electrical and electronic components and their location > < Detaching