
Leon Mk1
|
|

|
|
|
 Note!
Note!| t | After having carried out work on the rear brake: |
| t | Let off hand brake. |
| t | Strongly operate the brake pedal once. |

| 1 - | Plate spring |
| q | To remove press it against the spring and turn 90º |
| 2 - | Spring |
| 3 - | Brake shoe with lever for hand brake |
| q | Removing and installing → Chapter |
| q | Adjust hand brake → Chapter |
| 4 - | Upper return spring |
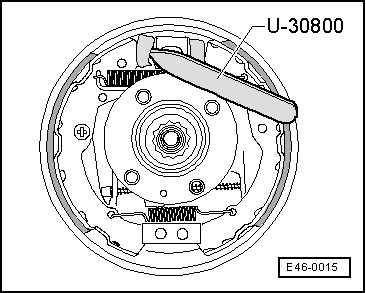
| q | Release with spring pliers |
| 5 - | Lower return spring |
| q | Grease friction zones with lubricating paste, part nº -G 000 650- |
| 6 - | Draft spring |
| 7 - | Brake shoes |
| q | Dimensions → Chapter |
| q | Repalce all brake shoes on the same axle. |
| q | Removing and installing → Chapter |
| q | Min. lining thickness: 2.5 mm |
| q | Check thickness → Booklet |
| 8 - | Cap |
| q | Remove to check lining thickness |
| 9 - | Tensioning bolt |
| 10 - | Brake back plate |
| 11 - | Allen head bolt |
| q | 10 Nm |
| 12 - | Wheel brake cylinder |
| q | Check for leaks |
| 13 - | Wedge |
| q | To remove and install the brake drum, press upwards and through one of the threaded openings for the wheel bolts. → Chapter |
| 14 - | Push rod |
| q | Grease friction zones with lubricating paste, part nº -G 000 650- |
| 15 - | Contact spring |
| q | Release with spring pliers |
|
|