
Leon Mk1
| Complete half shaft with tripod type joint: repairs |
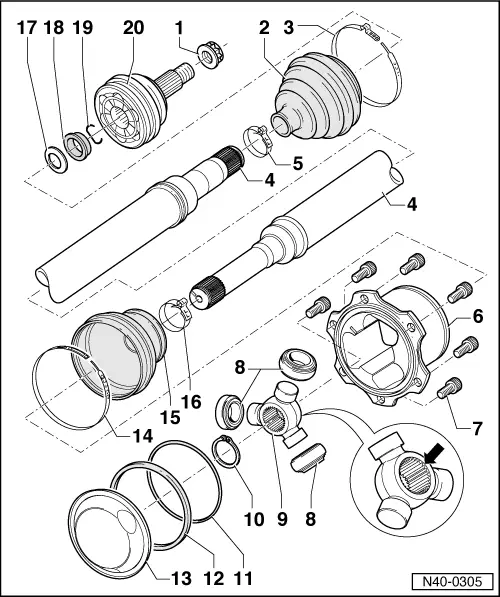
| 1 - | Twelve-sided, self-locking nut |
| q | Tighten → |
| q | Before tightening the nut, clean away paint remains. |
| q | Replace after removing |
| 2 - | Dust guard for constant velocity joint |
| q | Ensure that there is no damage or cracks from friction |
| 3 - | Clamp |
| q | Replace |
| 4 - | Complete half-shaft |
| 5 - | Clamp |
| q | Replace |
| 6 - | Joint casing |
| 7 - | Bolt with internal splined head |
| q | 40 Nm |
| 8 - | Rollers |
| 9 - | Tripod |
| q | The bevel -arrow- should face the cog of the complete half-shaft |
| 10 - | Securing ring |
| q | Replace |
| q | Fit into the groove on the complete half-shaft |
| 11 - | O-ring |
| q | This is not necessary for the assembly. |
| 12 - | Square shaped joining ring |
| q | Included in the repair kit. It is not included in the vehicle as standard |
| 13 - | Cover |
| q | If it is removed it cannot be reused. |
| q | It is not essential for assembly and is therefore not supplied as a spare |
| 14 - | Clamp |
| q | For tripod type joint |
| q | As standard it is mounted on the left hand side |
| 15 - | Dust guard for tripod type joint |
| 16 - | Clamp |
| 17 - | Plate spring |
| q | Ø the largest side(concave side): joined to the retaining ring |
| 18 - | Retaining ring |
| 19 - | Securing ring |
| q | Replace |
| q | Fit into the groove on the complete half-shaft |
| 20 - | Constant velocity exterior joint |
| q | Only replace completely. |
| q | Removing → Fig. |
| q | Fitting: slide onto the half shaft to the limit by tapping with a plastic mallet |
| q | Grease → |
| q | Verification → Chapter |