
Leon Mk1
| Power steering box: assembly overview |
| No repairs to the power steering box are foreseen. In the event of any anomaly, its cause must be determined by performing a pressure test and consulting the running gear fault location programme no. 10. |
 Note
Note| t | Replace bolts and self-locking nuts. |
| t | No welding or straightening work is allowed on the elements of the steering system. |
| t | Use only steering box grease -AOF 063 000 04- to lubricate the rack. |
| t | Hydraulic oil: -G 002 000- |
| t | Amount of oil in the system: approx. 1 litre. |
| t | Never re-use the hydraulic oil. |
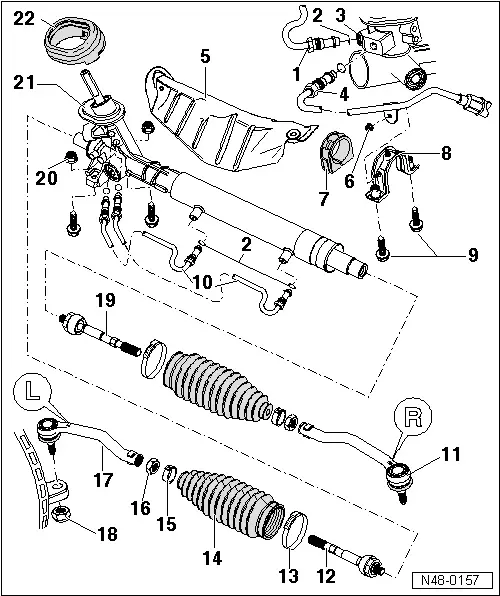
| 1 - | Return pipe, 12 Nm |
| Previously made of steel, currently made of aluminium. |
| 2 - | O-ring |
| q | Replace |
| 3 - | Threaded connection |
| q | Return pipe |
| 4 - | Pressure pipe, 30 Nm |
| 5 - | Heat shield |
| 6 - | Hexagonal nut |
| q | 8 Nm |
| 7 - | Rubber insert |
| 8 - | Clip with nuts |
| q | Replace if the thread is damaged |
| 9 - | Hexagonal bolts, 60 Nm |
| q | Replace |
| q | 4 units to fasten the steering box to the strut support |
| 10 - | Hydraulic piping |
| q | 7 Nm |
| q | Take care not to damage the O-ring during assembly |
| q | Keep in mind that the assembly must be carried out without tension |
| q | Do not damage the surface. If necessary, repair damage to paintwork |
| 11 - | Ball joint of right-hand side track rod |
| q | Marked with an “R”-arrow- |
| q | Check for damage, and ensure that the protective bellows are fitted correctly |
| 12 - | Left-hand side track rod, 80 Nm |
| q | Loosen and fasten → Fig. |
| q | Remove and fit with the steering box mounted → Chapter |
| q | Check and adjust its length → Chapter |
| q | Adjust the convergence → Chapter |
| 13 - | Tightening clip |
| q | Tighten with the -V.A.G 1275- |
| 14 - | Dust guard |
| q | Check for possible damage |
| q | It may be replaced with the steering box mounted |
| Removing: |
| q | Mark the position of the ball joint of track rod on the thread. |
| q | Loosen the counter nut. |
| q | Loosen the ball joint. |
| q | Test drive the vehicle after the assembly. |
| q | Check the position of the steering wheel, and adjust the convergence, if necessary. |
| q | Do not twist it after carrying out the convergence adjustment |
| 15 - | Tightening clip |
| q | Tighten with the -V.A.G 1275- |
| 16 - | Hexagonal nut, 55 Nm |
| 17 - | Ball joint of left-hand side track rod |
| q | Marked with an “L”-arrow- |
| q | Check for damage, and ensure that the protective bellows are fitted correctly |
| 18 - | Self locking nut |
| q | 30 Nm, and turn a further 90° |
| 19 - | Right-hand side track rod, 80 Nm |
| q | Loosen and fasten → Fig. |
| q | Remove and fit with the steering box mounted → Chapter |
| q | Check and adjust its length → Chapter |
| q | Adjust the convergence → Chapter |
| 20 - | Self locking nut |
| q | Replace |
| 21 - | Power steering box |
| q | Removing and fitting up to year 2000 models → Chapter |
| q | Removing and fitting from year 2001 models onwards → Chapter |
| 22 - | Seal |
Note
|

|