| Removing and installing dash panel insert |

Note | Before renewing the dash panel insert, the work procedure „Renewing dash panel insert“ should always be carried out in order that the data stored in the control unit can be read. |
| In the following, the current data (codes, service data, distance travelled) is read out of the dash panel insert. |
| –
| Connecting diagnosis tester -VAS - → Chapter. |
| –
| Select the operating mode „Guided fault finding“ on vehicle diagnosis tester -VAS -. |
| –
| Using „GoTo“ button, select „Functions/component“ and then the following menu options in succession: |
| t
| Diagnostic capable systems |
| t
| Functions of dash panel insert |
| t
| Fit a new dash panel insert. |
Note | t
| If a new dash panel insert is installed in the vehicle, the control unit of the dash panel insert must be adjusted to the different equipment features and associated country settings. |
| t
| To adapt the integrated electronic immobiliser in the engine control unit, the data from this unit must be recorded onto the new instrument panel. |
| t
| If a new dash panel insert is installed, all ignition keys must be adapted. |
| t
| Before renewing the dash panel insert, the work procedure „Renewing dash panel insert“ should always be carried out in order that the data stored in the control unit can be read → Chapter. |
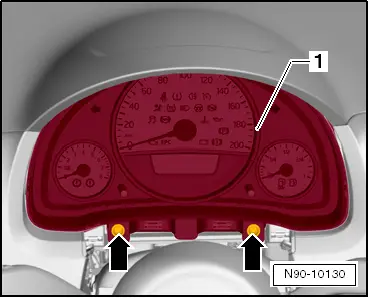
| –
| Switch off ignition and all electrical consumers, and remove ignition key. |
Note | There is no need to remove the steering wheel. |
| –
| Lock steering wheel in lowest position. |
|
|
|