
Leon Mk2
| Clutch: repairing |
| (Gearbox removed) |
 Note!
Note!| t | Always replace any clutch plates and pressure plates with damaged or loose rivets |
| t | To fit the plate with the corresponding pressure plate, check the Parts film and the engine code letters |
| t | Fit the clutch so that the flywheel centring dowel pins fit into the corresponding the orifices or grooves of the press. If this is not done, the TDC of the flywheel will not be exact |
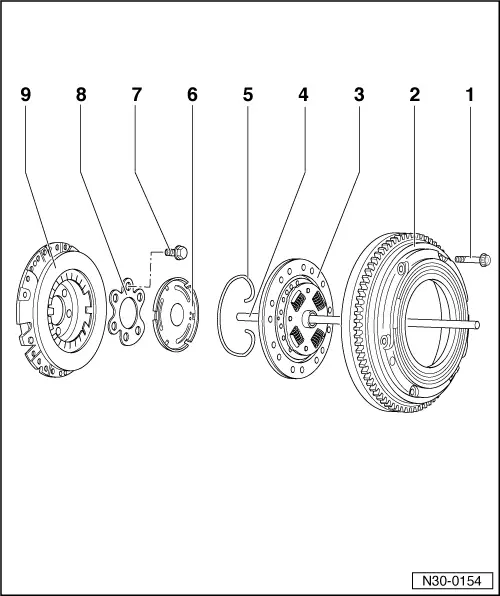
| 1 - | Twelve-sided nut |
| q | 20 Nm |
| q | Tighten and loosen diagonally in several stages |
| 2 - | Flywheel |
| q | Removing and fitting → Chapter, Clutch: removing and installing |
| q | Check that the centring pins are correctly seated |
| q | The clutch plate contact surfaces must not have grooves and must be free from oil and grease |
| 3 - | Clutch plate |
| q | Center → Anchor |
| q | Diameter → Chapter, Code letters, group numbers, ratios, filling quantities |
| 4 - | Clutch pushrod |
| q | Grease the area where the guide bush of the input shaft is fitted |
| q | Assembly position: conical side towards the clutch plate |
| 5 - | Retaining circlip |
| 6 - | Clutch release plate |
| q | Apply a very thin coating of -G 000 100- grease on the support surface and the clutch pushrod housing |
| q | Check that the pushrod housing is not deformed |
| 7 - | Bolt securing the clutch press to the crankshaft |
| q | 60 Nm + 90° |
| q | Always renew |
| 8 - | Intermediate plate |
| q | Installation position → Anchor |
| 9 - | Clutch press |
| q | Removing and fitting → Chapter, Clutch: removing and installing |
| q | Maximum internal deformation of the clutch press: 0.2 mm |
| q | Replace the rivetted joint if damaged or loose |