seat Workshop Repair Guides

SEAT Workshop Service and Repair Manuals

Gearbox mechanics,operation, construction,diff. > < ?LuK? clutch: Assembly overview (Vehicles with turbo diesel engine)
Removing and installing „LuK“ clutch (vehicles with turbo diesel engine)
   
Removing and installing „LuK“ clutch (vehicles with turbo diesel engine)
Special tools and workshop equipment required
t  Counterhold tool -3067-
t  Torque wrench -V.A.G 1331-
t  Grease for clutch plate splines -G 000 100-
t  Centring mandrel. -T10097-
  W30-0022
t  For engines having a crankshaft of smaller diameter or having needle bearings in the crankshaft - → Fig.centring mandrel -3176-
Detaching
l  Remove gearbox.
–  Insert counterhold tool -3067- to slacken bolts.
–  Loosen diagonally in several stages.
–  Remove pressure plate and clutch plate.
Installing
Installation is carried out in the reverse sequence; note the following:
  Note
t  Select clutch plate and pressure plate according to engine code and → Electronic parts catalogue „ETKA“.
t  Check whether dowel sleeves for centring the engine/gearbox assembly are fitted in the cylinder block; install if necessary.
t  If the dowel sleeves are not fitted, this will lead to gear-change problems, clutch malfunction and in some cases gearbox noise (gears will make rattling noises).
  W00-0085
Installation position of clutch plate
l  The inscription „Getriebeseite“ should face the gearbox
  A30-0132
Check ends of diaphragm spring
l  Wear to half the thickness of the diaphragm spring -arrows- is permitted.
  A30-0152
Checking spring connections and riveted connections
–  Check spring connections -arrows A- for damage and riveted connections -arrows B- for secure seating.
  A30-0153
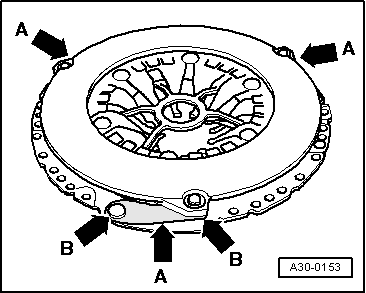
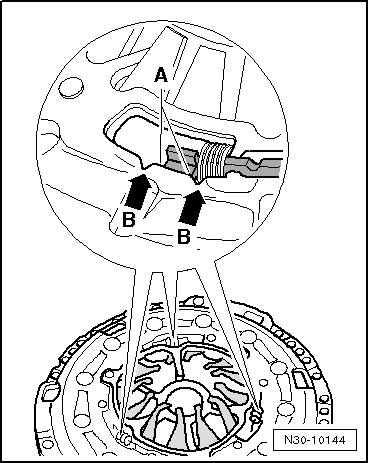
Checking position of adjustment mechanism (new pressure plates only)
l  
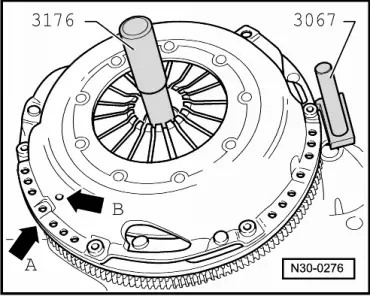
The two edges -A- of the adjuster ring should be located between the two notches -arrows B-.
l  If the adjuster ring is in a different position on a new pressure plate, the pressure plate and clutch plate must not be installed.
l  The adjuster ring may take up a position outside the notches in used clutches.
  Note
t  Renew clutch plate and pressure plate if riveted joints are damaged or loose.
t  Renew pressure plate and clutch plate together only.
t  Select clutch plate and pressure plate according to engine code and → Electronic parts catalogue „ETKA“.
t  
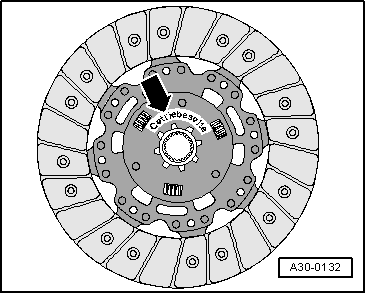
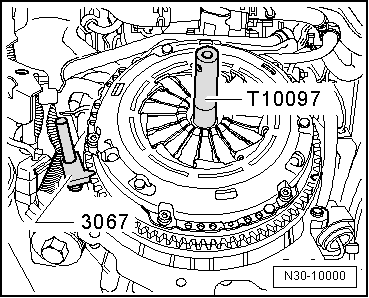
Clean input shaft splines and, on used clutch plate, hub splines. Remove corrosion and apply only a very thin coat of clutch plate spline grease -G 000 100- to splines. Then move the clutch plate on the input shaft from side to side, until the hub moves smoothly on the shaft. Excess grease must be removed.
t  
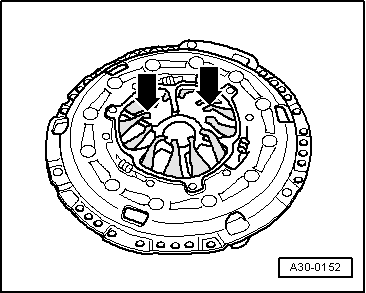
Pressure plates are protected against corrosion and greased. Only the contact surface may be cleaned, otherwise the service life of the clutch will be considerably reduced.
t  Pressure plate contact surface and clutch plate lining must make full contact with flywheel. Only then insert bolts.
  N30-10144
–  Reverse position of counter-hold tool -3067- when installing.
  N30-10000
For engines having a crankshaft of smaller diameter -arrow- or having an needle bearing -arrow- in the crankshaft
  N34-10979
Centring clutch disc and removing and installing pressure plate for engines having a crankshaft of smaller diameter or having a needle bearing -arrow- in the crankshaft
  Note
Disregard arrows -A- and -B-.
Continuation for all vehicles
Install pressure plate as follows so it is not deformed during installation (leads to jolts when moving off):
–  Position pressure plate on dowel pins.
–  Screw in all bolts evenly by hand until bolt heads make contact with pressure plate.
–  Tighten bolts in small steps diagonally in order not to damage centring holes of pressure plate and centring pins of dual-mass flywheel → Item.
l  Install gearbox.
  N30-0276

Gearbox mechanics,operation, construction,diff. > < ?LuK? clutch: Assembly overview (Vehicles with turbo diesel engine)