seat Workshop Repair Guides

SEAT Workshop Service and Repair Manuals

Control unit and hydraulic unit: fitting > < Unscrew control unit from hydraulic unit
Fitting a new control unit
   
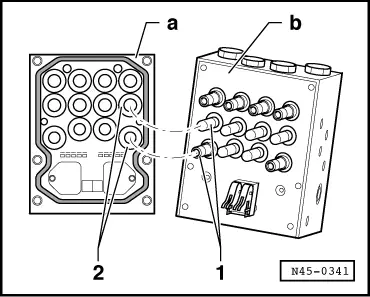
When connecting the control unit -a- with that of the hydraulic unit -b-, take care that the valve stems -1- do not remain hanging to the control unit -2- solenoids.
–  Place the control unit on the hydraulic unit.
–  Press the control unit on the contact surface of the hydraulic unit until the entire circumference of the control unit is flush evenly with the hydraulic unit recess and hold it.
  N45-0341
–  First screw in both centre screws -1 and 2- one after another until the control unit is secured to the hydraulic unit.
  Note
Only use the new Torx screws provided!
–  Now insert and screw in the screws -3 to 6- until the screw heads lie on the control unit compartment.
–  Now slightly tighten the screws one after another.
–  Now tighten the bolts in the sequence -1 - 6- to the specified tightening torque.
The control unit thread cannot be machined to secure the control unit. If the thread is damaged (it is only difficult to screw in the bolts by hand and cannot be tightened up to the specified tightening moment), the hydraulic unit must be replaced.
  E45-10010
–  In the dotted area -arrow-, mark each hydraulic unit assembly with a control unit with a punch mark.
  Note
A maximum of 5 screw connections (hydraulic unit - control unit) are permitted for the lifetime of the hydraulic unit.
  N45-10047

Control unit and hydraulic unit: fitting > < Unscrew control unit from hydraulic unit