seat Workshop Repair Guides

SEAT Workshop Service and Repair Manuals

CII 41 HR TRW brake caliper: removal and installation > < Removing
Installing
Installing
Carry out installation in the reverse sequence, noting the following:
  Note
t  
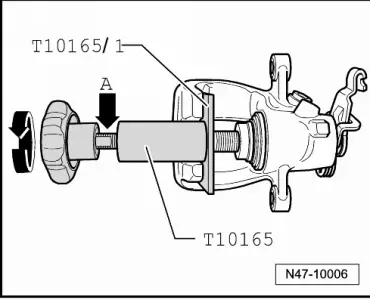
Before mounting of new brake pad open/close piston with the wrench -T10165-push in cylinder.
t  If brake fluid has been added, before retracting the piston towards the interior of the cylinder, a part of the liquid must be sucked from the brake fluid tank, use the brake bleeder -SAT 1175B-. Otherwise brake fluid may spill out causing damage to the bodywork.
  WARNING
Brake fluid is toxic and should never be sucked by mouth using a flexible tube.
–  Screw piston on knurling wheel through open/close clock wise rotation on knurling wheel of wrench -T10165-, ensure that the protective cap is not damaged.
   
–  Use the plate to screw in the -T10165/1- piston.
t  If piston will not move easily, a 13 mm open-end spanner can be applied at the flats provided -arrow A-.
  N47-10006
–  Insert pad retainers -arrows- and brake pads into brake carrier.
  N46-10093
–  Ensure that brake pads are seated correctly in pad retainers -arrows-.
–  Secure brake caliper with new self-locking bolts → Item.
t  The repair kit contains four auto-locking hexagonal bolts that must always be fitted.
–  Fit wheels.
Specified torque of wheel bolts → Running gear, axles, steering; Rep. gr.44.
  Note
t  After every brake pad change, depress brake pedal firmly several times with vehicle stationary, so that brake pads are properly seated in their normal operating position.
t  Check brake fluid level after changing brake pads.
  N46-10094

CII 41 HR TRW brake caliper: removal and installation > < Removing