seat Workshop Repair Guides

SEAT Workshop Service and Repair Manuals

Removing and installing brake master cylinder|Installation > < Removing and installing brake master cylinder
Removal:
Removal:
–  Note or request radio code on vehicles with coded radio if necessary.
–  Disconnect battery → Electrical system; Rep. gr.27.
–  Remove air filter.
–  Remove battery → Electrical system; Rep. gr.27.
–  Remove battery tray.
–  Place sufficient lint-free cloths in area of engine and gearbox.
–  Draw off as much brake fluid as possible from brake fluid reservoir using brake filling and bleeding equipment -VAS 5234- or extraction unit -V.A.G 1869/4-.
Vehicles with manual gearbox:
   
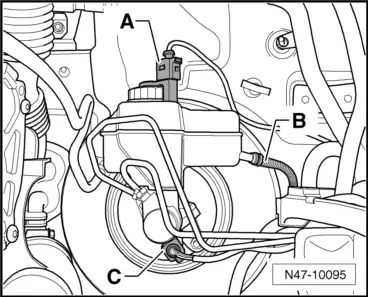
–  Detach supply hose -B- for clutch master cylinder, lift clear and tie in place, or clamp off supply hose -B- for clutch master cylinder with a commercially available tool, e.g. Hazet 4590, and then pull off.
All vehicles (continued):
–  Disconnect connector -A- from brake fluid level warning contact -F34-.
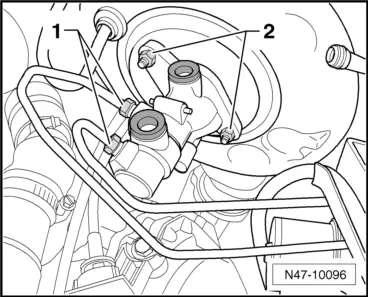
–  Separate connector -C- from brake light switch -F-.
  N47-10095
–  Remove brake fluid reservoir. To do this press locking tabs on reservoir outwards and simultaneously pull brake fluid reservoir out of sealing plugs.
–  Disconnect the brake pipes -1- from the brake master cylinder and seal the brake pipes with plugs from repair kit 1H0 698 311 A.
–  Unscrew the nuts -2- from the master brake cylinder.
–  Remove heat shield (if installed).
–  Carefully remove brake master cylinder from brake servo.
–  Unscrew brake light switch -F- from brake master cylinder.
  N47-10096

Removing and installing brake master cylinder|Installation > < Removing and installing brake master cylinder