
Leon Mk2
| Servicing front wheel brakes, Lucas brake caliper |
 Note!
Note!| t | After replacing brake pads, depress brake pedal firmly several times with vehicle stationary so that the brake pads are properly seated in their normal operating position. |
| t | To draw off brake fluid from the reservoir, use a bleeder bottle which is used only for brake fluid. Brake fluid is poisonous and must on no account be sucked out by mouth using a hose! |
| t | Fit brake pedal depressor -V.A.G 1869/2- before removing a brake caliper or disconnecting a brake hose. |
| t | Wheel bolts tightening torque: 110 Nm |
| t | Do not re-use used brake fluid. |
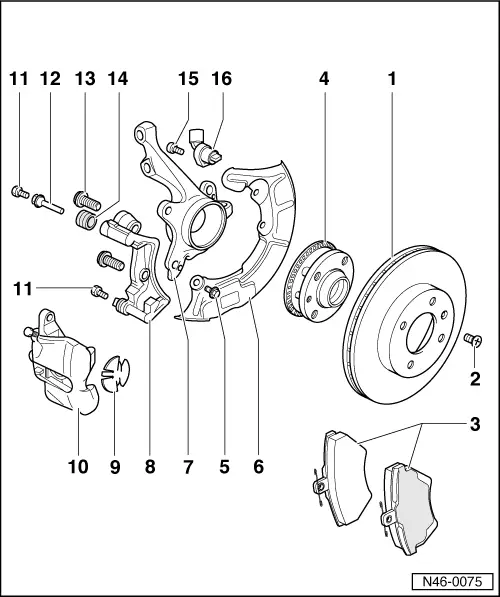
| 1 - | Brake disc, ventilated |
| q | Dimensions and wear limits → Chapter |
| q | When worn always renew both sides. |
| q | Never remove brake discs from hub by force. If necessary use penetrating fluid, otherwise brake discs can be damaged. |
| 2 - | Cross-head screw |
| 3 - | Brake pad |
| q | Removing and installing → Chapter |
| q | Checking thickness → Booklet |
| 4 - | Hub |
| q | Pressing out and in → Running Gear, Axles, Steering; Rep. Gr.40 |
| 5 - | Hexagon bolt, 10 Nm |
| 6 - | Splash plate |
| 7 - | Wheel bearing housing |
| 8 - | Brake carrier with guide pins and protective caps |
| q | Supplied as replacement part assembled with sufficient amount of grease on guide pins |
| q | If protective caps are damaged use repair kit |
| q | Use grease sachet supplied to lubricate guide pins |
| 9 - | Heat shield |
| q | Insert into piston |
| 10 - | Brake caliper |
| q | Servicing → Chapter |
| q | Removing and installing → Chapter |
| 11 - | Self-locking hexagon bolt, 35 Nm |
| q | Renew |
| 12 - | Guide pin |
| 13 - | Ribbed combi-bolt, 125 Nm |
| 14 - | Protective cap |
| 15 - | Hexagon socket head bolt, 8 Nm |
| 16 - | ABS speed sensor |
| q | Before inserting sensor, clean fitting hole inner surface and coat with lubricating paste -G 000 650- |