skoda Workshop Repair Guides

Skoda Workshop Service and Repair Manuals

Removing and installing the brake pedal - RHD version > < Assembly overview of the foot controls, brake pedal - RHD version
Removing and installing the foot controls - RHD version
Special tools and workshop equipment required
t  Vehicle system tester -V.A.G 1552- or vehicle diagnosis, measurement and information system -VAS 505x-
t  Release tool -T10159A-
Removing:
  Note
Before disconnecting the battery determine the code of radio sets fitted with anti-theft coding.
–  Disconnect battery → Electrical System; Rep. gr.27.
–  Removing the lower part of the dash panel → Body Work; Rep. gr.70.
Vehicles without air conditioning
–  Remove right footwell vent → Heating, Air Conditioning; Rep. gr.80.
Vehicles with air conditioning
–  Remove right footwell vent → Heating, Air Conditioning; Rep. gr.87.
Continued for all vehicles
   
–  Unscrew plastic nuts -1-.
–  Remove cover -2-.
–  Remove brake light switch → Chapter.
–  Pull out plug of accelerator pedal position sender -G79-.
–  Separating the brake pedal from the brake servo unit → Chapter.
  S48-0106
–  Unscrew the nuts for securing the foot controls -arrows-.
   The top and bottom nut for securing the foot controls is not visible in the figure. It is located at the bulkhead behind the crash strut.
–  Remove foot controls.
Installing:
Installation is carried out in the reverse order.
–  Setting and installing the brake light switch → Chapter
–  Connect battery → Electrical System; Rep. gr.27.
–  Perform automatic test sequence → Chapter using the vehicle system tester -V.A.G 1552- or the vehicle system test → Chapter using the vehicle diagnosis, measurement and information system -VAS 505x-.
  S46-0116
Tightening torque:
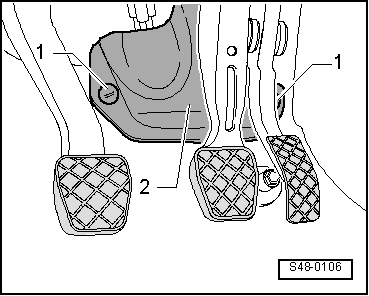
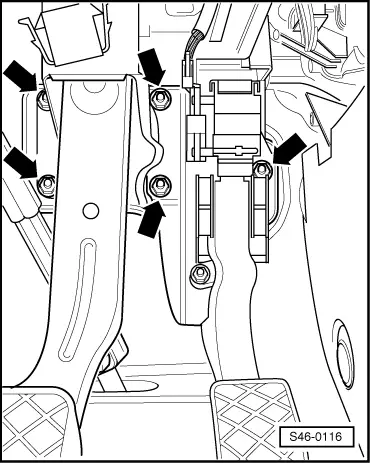
Foot controls on brake servo unit and on assembly plate
t  Use new nuts!
28 Nm


Removing and installing the brake pedal - RHD version > < Assembly overview of the foot controls, brake pedal - RHD version