skoda Workshop Repair Guides

Skoda Workshop Service and Repair Manuals

Setting the hand-brake - disc brake > < Removing and installing rear brake - Disc brake
Removing and installing brake pads - Disc brake
Special tools and workshop equipment required
t  Resetting tool -T 10165-
t  Bleeding bottle (commercially available)
t  Brake fluid → Chapter
  Note
t  When removing mark the brake pads you intend to keep using. Install in the same location, as otherwise this may cause uneven braking!
t  Do not unscrew the brake line on the brake caliper when replacing the brake pad.
Removing:
–  Remove wheel.
–  Disconnect the plug connection for the brake pad wear indicator (where the vehicle is fitted with this - only right vehicle side).
   
–  Lift off the clip -1- with a screwdriver and pull down to remove.
–  Push the brake lever -2- in the direction of the arrow and unhook the hand-brake cable -3-.
  S46-0166
–  Unscrew the fixing screws of the brake carrier while counterholding the guide bolts.
–  Remove the brake caliper and secure with wire in such a way that the weight of the brake caliper does not burden or damage the brake line.
  S46-0098
–  Remove the brake pads and pad retaining springs -arrows-.
  Note
t  Use alcohol only to clean the brake caliper housing.
t  The adherend for the brake pads must be free from glue residues and grease.
–  Clean the brake caliper.
Installing:
  Note
Drain brake fluid from the brake fluid reservoir using a ventilation bottle before pushing the piston back in.
  Caution
Brake fluid is toxic and must never be sucked off by mouth.
  Note
t  Only use the resetting tool to reset the piston.
t  When resetting the piston with a piston resetting device the automatic reset in the brake caliper is destroyed.
  S46-0104
–  Screw in the piston by turning the knurled wheel clockwise on the resetting tool -T 10165-, during this procedure do not damage the protective cap.
–  Use special tool -T 10165/1- for assembling.
t  Use open-jawed spanner on a provided spanner surface -arrow A- if the piston is difficult to move.
  S47-0090
–  Insert the new pad retaining springs -arrows- and brake pads in the brake carrier.
–  Remove the protective foil from the supporting plate of the brake pad.
  Note
There are four self-locking screws in the repair set, which must be fitted.
  S46-0104
–  Secure the brake caliper to the brake carrier using new self-locking screws.
   Hold the guide bolts while tightening the screws.
  S46-0098
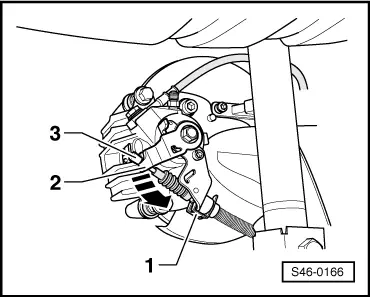
–  Push the brake lever -2- in the direction of the arrow and hook on the hand-brake cable -3-.
–  Fit clip -1-.
–  Connect up the plug connection for the brake pad wear indicator (where the vehcile is fitted with this - only right vehicle side).
  Note
t  Observe the instructions for changing the pad → Chapter.
t  After each brake pad replacement, forcefully apply the brake pedal repeatedly to ensure the brake pads go into their normal operating position.
–  Depress brake pedal firmly several times when the vehicle is stationary
–  Setting the hand-brake → Chapter.
–  Attach the wheel.
  Note
Check brake fluid level after replacing the brake pads, if necessary top up with brake fluid.
  S46-0166
Tightening torque:
Brake caliper to brake carrier
t  Use new screws!
35 Nm


Setting the hand-brake - disc brake > < Removing and installing rear brake - Disc brake