
Repairing Front Brake for Fabia Mk1: Floating Caliper Disc Brake C54
 Note
Note
|
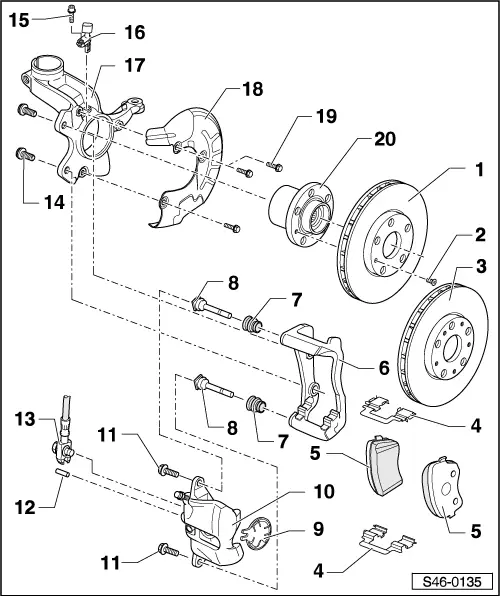
| 1 - | Brake disc |
| q | the max. wheel run-out is not marked |
| q | released combination of a brake disc without marking and a wheel hub with marking |
| q | with a fixing hole for the wheel hub |
| q | Thickness: 25 mm |
| q | Wear limit: 22 mm |
| q | always replace axle-wise |
| q | for removing, first of all unbolt brake caliper complete from wheel bearing housing |
| q | Do not use force to separate the brake discs from the wheel hub, if necessary use rust solvent; as you could otherwise damage the brake discs. |
| 2 - | 4 Nm |
| 3 - | Brake disc |
| q | with a marking approx. 5 mm wide for marking the maximum wheel run-out |
| q | released combination of a brake disc with marking and a wheel hub without marking |
| q | with 5 fixing holes for the wheel hub |
| q | Thickness: 25 mm |
| q | Wear limit: 22 mm |
| q | always replace axle-wise |
| q | for removing, first of all unbolt brake caliper complete from wheel bearing housing |
| q | Do not use force to separate the brake discs from the wheel hub, if necessary use rust solvent; as you could otherwise damage the brake discs. |
| 4 - | Pad retaining plate |
| q | always replace when changing the brake pads |
| q | contained in the repair kit for brake pads |
| q | fit on before installing brake pads |
| 5 - | Brake pads |
| q | with wear indicator |
| – | with a corresponding wear (limit: 2 to 3 mm) the warning light in the dash panel insert lights up |
| q | Thickness: 18,6 mm (including the support plate) |
| q | Wear limit: 2.0 mm without supporting plate |
| q | Inspect thickness → BookletFabia |
| q | always replace axle-wise |
| q | do not unscrew the brake line when replacing the brake pad |
| q | removing and installing → Chapter |
| q | Observe the instructions for changing the pad → Chapter |
| 6 - | Brake carrier |
| q | is supplied as replacement part assembled with guide pin and protective caps as well as adequate quantity of grease on guide pins |
| q | if there is any damage to the protective caps or guide bolts fit a repair set (use the enclosed grease packing to lubricate the guide bolts) |
| q | also use grease packing for greasing the slot on the guide pin and brake caliper for attaching the protective cap |
| 7 - | Protective cap |
| q | contained in repair kit |
| q | insert into the slot of the brake carrier and of the guide pin; grease the slot first using grease packing from the repair kit |
| 8 - | Guide bolt |
| q | contained in repair kit |
| 9 - | Heat shield |
| q | always replace when changing the brake pads |
| q | contained in repair kit |
| q | insert into piston |
| Fitting location: insert plate at heat shield into the opening (slot) of the brake caliper |
| 10 - | Brake caliper |
| q | removing: |
| – | Use brake pedal load |
| – | Unscrew brake hose from brake caliper |
| – | Unbolt brake caliper from brake carrier |
| q | Installing: |
| – | Bolt brake caliper onto brake carrier |
| – | Screw the brake hose onto the brake caliper. |
| – | Remove brake pedal load |
| – | Bleeding Brake System → Chapter |
| q | repairing → Chapter |
| q | Observe the instructions for changing the pad → Chapter |
| 11 - | 30 Nm |
| q | replace after each removal |
| 12 - | Tensioning sleeve |
| 13 - | Brake hose with supports, hollow screw and gasket rings |
| q | must be replaced completely, do not dismantle |
| q | Tightening torque: 35 Nm |
| q | do not unscrew when replacing the brake pad |
| 14 - | 124 Nm |
| q | after the removal, clean the securing ribbing on the underside of the screw head |
| 15 - | Allan screw, 8 Nm |
| q | for speed sensor ABS |
| 16 - | ABS wheel speed sensor |
| 17 - | Wheel-bearing housing |
| 18 - | Cover plate |
| 19 - | 10 Nm |
| 20 - | Wheel hub with wheel bearing |
| q | with and without marking of the maximum wheel run-out |
| q | one can combine a wheel hub without marking of the maximum wheel run-out with a brake disc with marking of the maximum wheel run-out; the total wheel run-out of the floating caliper disc brake C54 will not be reduced |
| q | for vehicles with ABS the sensor ring is built into the wheel hub |
| q | replace after each removal, is destroyed during removal |
| q | removing and installing → Chapter |
| q | Assignment → Electronic Catalogue of Original Parts |