skoda Workshop Repair Guides

Skoda Workshop Service and Repair Manuals

Removing and installing the brake-pressure reducer > < Removing and installing brake-power regulator
Inspecting the brake-pressure reducer
The brake-pressure reducers are fitted only on vehicles without ABS and without load-dependent brake-power regulator, assignment → Electronic Catalogue of Original Parts.
Fitting location
   
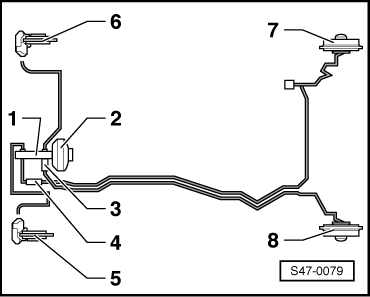
A brake-pressure reducer is fitted on each brake circuit.
The brake-pressure reducer -3- is screwed directly into the master brake cylinder -1-, the other brake pressure reducer -4- is connected to the master brake cylinder by means of a short brake line.
2 - Brake servo unit
5 - Front left disc brake:
6 - Front right disc brake:
7 - Rear right drum brake:
8 - Rear left drum brake:
Pressure test
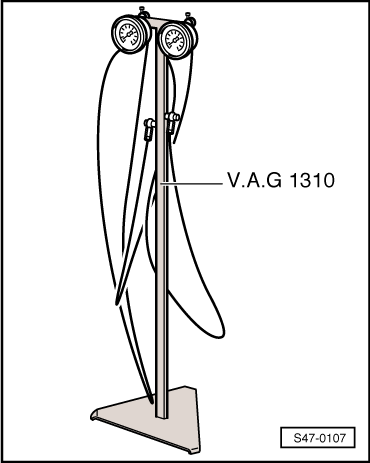
Special tools and workshop equipment required
t  Brake-power regulator or brake system tester, e.g. -V.A.G 1310- or -V.A.G 1310 A-
t  Brake filling and bleeding device, e. g. -VAS 5234-
  S47-0079
–  Raise vehicle and connect pressure gauge of the tester to the front left brake caliper and connect to the rear right wheel-brake cylinder. Because of the diagonal brake circuits after the pressure test proceed in the same way for the 2nd brake circuit (front right brake caliper and rear left wheel brake cylinder).
–  Bleed both pressure gauges.
–  Press brake pedal and measure pressures.
–  Compare measured pressure values to the nominal values → Chapter.
   At a given pressure of 10 MPa (100 bar) the pressure reducer must be closed.
   A drop in pressure of maximum 1MPa (10 bar) 3 minutes is allowed.
If the test pressures are not reached, inspect the brake system for leaks.
If the brake system is tight and the test values are exceeded, replace the brake pressure reducer. The brake pressure reducer must not be repaired.
–  Remove pressure gauge.
–  Bleeding Brake System → Chapter.
  S47-0107

Removing and installing the brake-pressure reducer > < Removing and installing brake-power regulator