skoda Workshop Repair Guides

Skoda Workshop Service and Repair Manuals

Repairing drive shaft with CV joint > < Removing and installing outer joint of drive shaft
Removing and installing a drive shaft
Special tools and workshop equipment required
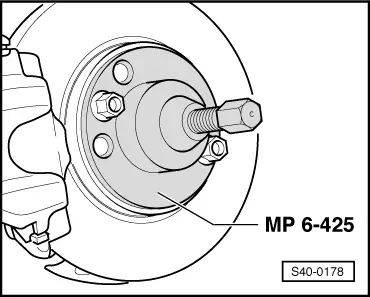
t  Extractor -MP6-425 (3283)-
t  Polycarbamide grease -G 052 142 A2-
t  Glue sealing mass -Loctite 601-
Removing:
–  Unscrew twelve-point nut (or plate nut) from the drive shaft.
–  Raise the vehicle until the front axle is free of stress.
–  Remove front wheel.
–  Remove noise insulation → Body Work → Rep. gr.50.
–  Unscrew the drive shaft from the flange shaft - gearbox, if necessary remove the protection plate above the inner joint.
   
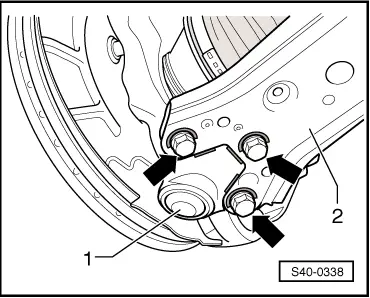
–  Mark fitting position of screws -arrows- from steering joint -1- to track control arm -2-.
–  Mark installation position of the steering joint -1- for the track control arm -2-.
–  Release screws -arrows-.
  S40-0338
–  Press out drive shaft with extractor -MP6-425 (3283)-.
–  Remove the drive shaft.
Installing:
  Note
Remove possible corrosion, grease or adhesive sealing material from the thread and from the serration of the outer joint as well as from the serration of the wheel hub.
Vehicles with mechanical steering
–  Smear the gearing of the outer joint of the drive shaft lightly with adhesive sealing material -Loctite 601-.
   Do not grease thread on the outer joint of the drive shaft.
Vehicles with power steering
–  Grease the serration on the propeller shaft with polycarbamide grease -G 052 142 A2-.
   Do not grease thread on the outer joint of the drive shaft.
–  Grease the serration in the wheel hub with polycarbamide grease -G 052 142 A2-.
Continued for all vehicles
–  Insert the drive shaft in the serration of the wheel hub.
  S40-0178
–  When inserting the drive shaft insert at the same time the steering joint -1- into the track control arm -2- in accordance with the former positions and markings.
–  Screw the drive shaft onto the flange shaft - gearbox and initially tighten to 10 Nm.
–  Secure the outer joint of the drive shaft with a new twelve-point nut.
  Note
t  Always replace plate nuts of drive shaft on both sides by twelve-point nuts.
t  Always fit new nuts for the drive shaft.
–  Tighten the drive shaft on the flange shaft - gearbox to the prescribed torque.
–  Screw the track control arm -1- with the steering joint -2- with new screws -arrows- and new lock washer in accordance with the former positions and markings.
–  Tighten the new screws -arrows- in accordance with the markings and the former positions to the specified tightening torque.
Further installation occurs in reverse order.
  S40-0338
Tightening torques:
Drive shaft to flange shaft/gearbox
t  Use new screws!
→ Item
Twelve-point nut for securing the drive shaft to wheel hub with mechanical steering
t  Use new nut!
t  Do not grease thread of the outer joint of the drive shaft.
50 Nm
Twelve-point nut for securing the drive shaft to wheel hub with power-assisted steering
t  Use new nut!
t  Do not grease thread of the outer joint of the drive shaft.
50 Nm + 45°
Steering joint to track control arm
t  Use new screws!
t  Use new lock washer!
20 Nm + 90°
Protection plate for inner joint of drive shaft25 Nm
Wheel bolts120 Nm


Repairing drive shaft with CV joint > < Removing and installing outer joint of drive shaft