skoda Workshop Repair Guides

Skoda Workshop Service and Repair Manuals

Repairing cylinder head > < Removing
Install
Install
  Note
t  Remove the new cylinder head gasket from its wrapping immediately before fitting.
t  Treat the seal with the utmost care. Any damage will result in leaks.
t  There must not be any oil or coolant present in the threaded holes for the cylinder head bolts.
  WARNING
Wear protective gloves when working with sealant and grease remover!
  Note
Make sure that when cleaning the cylinder head and cylinder block no foreign bodies can get into the cylinders, the openings for the push rods, the oil and coolant galleries or into the threaded holes.
–  Carefully remove old sealant residue from the cylinder head and cylinder block using a chemical sealant remover.
–  Turn the crankshaft in such a way that all pistons are at the same height. While doing so the liners must no be pushed out; if necessary press down.
–  Position the new cylinder head gasket in such a way that the marking of the part number is at the top.
  Note
Before inserting the cylinder head make sure all liners are correctly fitted in the cylinder block.
–  Insert the cylinder head.
–  Insert the push rods with the ball socket from the top in accordance with their original location.
  Note
When inserting the push rods carefully introduce them in the ball socket of the tappet and in the ball knobs of the adjusting screws. Wrongly inserted push rods (with ball head on the edge of the tappet or with the edge on the ball head of the adjusting screw) result in faults in the basic setting of the valve gear or damage when the engine is started.
–  Moisten the thread of the cylinder head bolts with oil.
–  Fit the rocker arm shaft and tighten the fixing screws by hand.
   
–  Insert the other cylinder head bolts/nuts and tighten by hand. Observe the following bolt length and installation with/without washers:
  N15-0221
Pos.Bolt lengthWasher
1, 2, 3, 6, 7168 mmyes
4, 5, 8, 9185 mmno
10132 mmyes

–  Tighten the cylinder head bolts/nuts in the following sequence:
   
Pos.Tightening order
1 to 10Stage I:20 Nm
 Stage ll:torque a further 1/4 turn (90°) using a rigid wrench
 Stage lll:torque a further 1/4 turn (90°) using a rigid wrench
11 to 14 20 Nm

–  Install the generator support bracket → Item
   Insert bolt → Item with locking agent -AMV 105 500-.
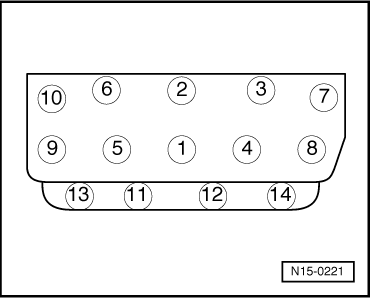
–  Tighten the rocker arm shaft screws crosswise evenly to 25 Nm.
–  Perform basic setting of hydraulic valve clearance compensation → Chapter.
  Note
The basic setting of the hydraulic valve clearance compensation must not be carried out again, if only the cylinder head gasket is replaced.
–  Install the V-ribbed belt on vehicles with air conditioning → Chapter.
Further installation occurs in reverse order to removal. However, pay attention to the following:
–  Install exhaust pipe with catalytic converter → Chapter.
–  Top up coolant → Chapter.
–  Adapt the engine control unit to the throttle valve control unit -J338- → Vehicle diagnosis, testing and information system VAS 5051.
–  Perform a test drive and interrogate fault memory and erase → Vehicle diagnosis, testing and information system VAS 5051.
   

Repairing cylinder head > < Removing