
Fabia Mk1
|
 Note
Note| t | The design of the 1.0 litre engine is essentially identical to that of the 1.4 ltr. engine. Differences exist only in the version of the crankshaft and its mounting → Chapter. |
| t | Repairs to the clutch → gearbox; Rep. Gr.30. |
| t | The engine should be attached to the engine repair stand -MP1-180- or -MP1-202 - on the engine holder -MP9-101- to carry out removal and installation work. |
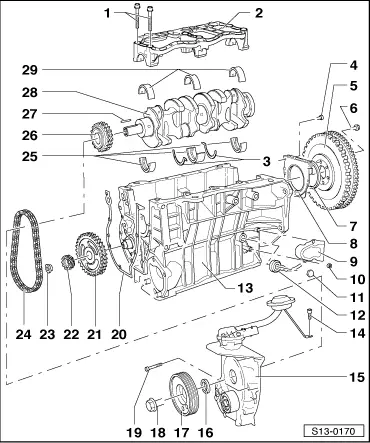
| 1 - | 75 Nm |
| 2 - | Crankshaft bearing unit |
| 3 - | Thrust washer |
| q | for middle bearing |
| q | lubricating grooves point outwards |
| 4 - | 8 Nm |
| q | coat with -AMV 188 520- (Loctite 574) before inserting |
| 5 - | Flywheel |
| q | with sensor rotor for engine speed sender -G28- |
| q | lock with -MP1-504- for removing and installing. |
| q | replace ring gear → Chapter |
| q | installation position to crankshaft: |
| t | on the 1.0 ltr. engine, the two “missing” teeth of the rotor must face forward when the crankshaft is positioned on TDC for cyl. 1 (marking of belt pulley - crankshaft is opposite marking “0” at timing case) |
| t | only one installed position is possible for the 1.4 litre engine (since the bore holes are varying distances apart) |
| 6 - | 30 Nm + torque a further 90° (1/4 turn) |
| q | replace |
| q | before installing, coat with -AMV 200 000- (Loctite 270) |
| 7 - | Sealing ring |
| q | replace |
| q | remove sealing flange for removing and installing |
| q | lightly oil sealing lip and outer edge before installing |
| q | press into the sealing flange |
| 8 - | Sealing flange |
| q | not available as replacement part (only together with cylinder block) |
| q | coat with -AMV 188 520- (Loctite 574) before inserting |
| 9 - | Heat shield |
| q | for knock sensor -G61- |
| 10 - | 5 Nm |
| 11 - | 20 Nm |
| q | The tightening torque influences the knock sensor function |
| 12 - | Knock sensor 1 -G61- |
| 13 - | Cylinder block |
| q | Disassemble and assemble piston, conrod and liner → Chapter |
| 14 - | 8 Nm |
| 15 - | Timing case |
| 16 - | Sealing ring |
| q | replace → Chapter |
| 17 - | Belt pulley |
| q | at the crankshaft |
| 18 - | 100 Nm |
| q | to release and tighten lock flywheel |
| t | Engine removed: with -MP1-504- |
| t | Engine installed: with locking screw → Chapter |
| 19 - | 7 Nm |
| q | coat with -AMV 105 500- (Loctite 242) before inserting |
| 20 - | Gasket |
| q | replace |
| 21 - | Camshaft sprocket |
| q | after replacing, inspect synchronous running of chain sprockets → Chapter |
| q | Camshaft setting → Fig. |
| 22 - | Helical gear |
| q | for oil pump drive |
| 23 - | 25 Nm |
| q | coat with -AMV 154 100- (Loctite 648) before inserting |
| 24 - | Timing chain |
| q | mark running direction (installed position) before removing |
| q | always replace complete with crankshaft sprocket and camshaft sprocket |
| 25 - | Bearing shell |
| q | for cylinder block with lubricating groove |
| q | do not mix up used bearing shells (mark) |
| 26 - | Crankshaft sprocket |
| q | after replacing, inspect synchronous running of chain sprockets → Chapter |
| q | Camshaft setting → Fig. |
| 27 - | Woodruff key |
| q | check tightness |
| 28 - | Crankshaft |
| q | Axial play when new: 0.03 up to 0.13 mm |
| q | Wear limit: 0.26 mm |
| 29 - | Bearing shell |
| q | for crankshaft bearing unit without lubricating groove |
| q | do not mix up used bearing shells (mark) |