skoda Workshop Repair Guides

Skoda Workshop Service and Repair Manuals

Test combustion misfiring > < Removing and installing ignition coils with power output stages
Testing knock sensorG61
Testing knock sensor -G61-
  Note
t  The perfect functioning of the knock sensor requires an exact tightening torque of 20 Nm.
t  Only use gilded contacts to repair contacts in the plug connection of the sender.
Special tools and workshop equipment required
t  Test box -V.A.G 1598/31- or -V.A.G 1598/22-
t  Handheld multimeter, e.g. -V.A.G 1526 B-
t  Measuring tool set, e.g. -V.A.G 1594 C-
t  Current flow diagram
Test condition
l  Fault on knock sensor detected by self-diagnosis.
Test sequence
   
–  Disconnect the 2-pin plug from the knock sender -arrow-.
–  Connect test box -V.A.G 1598/31- or - V.A.G 1598/22- to the wiring loom of the control unit → Chapter. The engine control unit is not connected here.
  S28-0150
–  Check wiring between the test box and the 2-pin plug for interruption according to the current flow diagram → Current flow diagrams and Fitting locations.
Cable resistance: max. 1.5 Ω
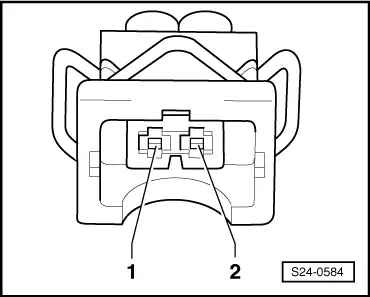
–  Test the cables for short circuiting with each other.
Specified value: ∞ Ω
If the lines are not found to be faulty:
–  Slacken knock sensor and then tighten again to 20 Nm.
–  Perform a test drive.
Comply with the safety instructions for a test drive → Chapter.
During the test drive the following operating conditions must be fulfilled:
t  The coolant temperature should rise beyond 80°C.
t  After reaching the corresponding temperature, the following operating conditions must be reached a number of times: Idling, part load, full load, overrun.
t  In case of full load the speed should be increased beyond 3500 rpm.
–  Interrogate the fault memory on the control unit again.
If the complaint still exists:
–  Replace knock sensor -G61- → Chapter.
  S24-0584

Test combustion misfiring > < Removing and installing ignition coils with power output stages