skoda Workshop Repair Guides

Skoda Workshop Service and Repair Manuals

Testing oil pressure and oil pressure switch > < Oil filter holder and engine oil cooler - Summary of components
Removing and installing oil pan
Special tools and workshop equipment required
t  Sealant remover gasket stripper (bearing code GST, bearing article no. R 34402), manufacturer Retech s.r.o.
t  Cleaning agent and grease remover e.g. -D 009 401 04-
t  Silicone sealant -D 176 404 A2-
t  Flat scraper
Removing
   
–  Remove noise insulation -arrows-.
–  Remove bracket for bottom charge-air pipe → Chapter (Pos. 22).
–  Drain engine oil.
–  Remove the screws of oil pan/cylinder block.
–  Turn the crankshaft and observe the flywheel, until it faces with the recess downwards.
–  Remove oil pan.
–  Release oil pan if necessary by applying slight blows with a rubber-headed hammer.
  WARNING
Wear protective gloves when working with sealant and grease remover!
–  Clear sealing surface on cylinder block and on the oil pan from gasket residues with chemical sealant remover.
–  Degrease the sealing surfaces. They must be free of oil and grease.
Install
  Note
t  Pay attention to the use by date on sealant.
t  The oil pan must be installed within 5 minutes after applying the silicone sealant.
  S10-0114
–  Cut off nozzle tube at the front marking (Ø of nozzle approx. 3 mm).
–  Apply silicone sealant to the clean sealing surface of the oil pan, as shown in the illustration.
t  Thickness of sealant bead: 2...3 mm.
t  The sealant must be run past on the inside in the area of the bolt holes -arrows-.
  Note
The sealant bead must not be thicker otherwise excess sealant may get into the oil pan and clog the strainer in the oil pump.
  N17-0019
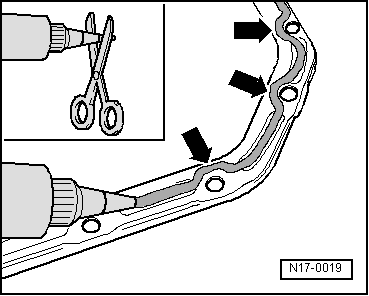
–  Apply silicone sealant to the clean sealing surface of the oil pan, as shown in the illustration. (The diagram shows the sealant bead on the cylinderblock.)
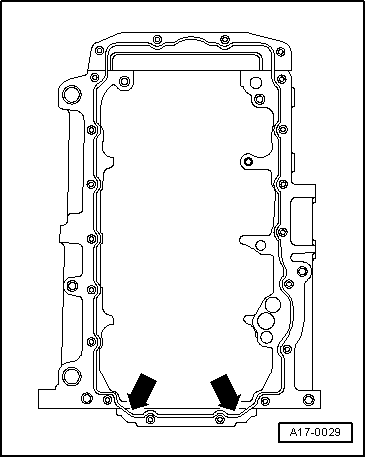
–  Fit oil pan immediately and lightly tighten all oil pan screws.
–  Tighten the oil pan bolts to 15 Nm.
–  Install the bolts on the oil pan/gearbox to a torque of 45 Nm.
  Note
t  After installing the oil pan, allow the sealant to dry for about 30 minutes. Only then may engine oil be filled in.
t  The oil pan must be aligned with the cylinder block.
Further installation occurs in a similar way in reverse order to removal.
  A17-0029

Testing oil pressure and oil pressure switch > < Oil filter holder and engine oil cooler - Summary of components