skoda Workshop Repair Guides

Skoda Workshop Service and Repair Manuals

Removing and installing the sender for fuel gauge displayG > < Extract fuel from the fuel tank
Removing and installing fuel delivery unit
Special tools and workshop equipment required
t  Wrench for union nut -MP1-227 (3217)-
Precondition
l  The ignition must be switched off and the ignition key must be withdrawn.
l  The fuel tank must not be more than 1/2 full.
  Note
t  If necessary, extract fuel from the fuel tank → Chapter.
t  Observe the safety instructions before starting fitting work → Chapter.
t  Observe rules for cleanliness → Chapter.
Removing
–  Remove the cover under the rear seat bench.
–  Disconnect the 4-pin plug as well as the feed line and the return-flow line from the flange of the fuel delivery unit.
  WARNING
The fuel feed line is pressurized! Place a clean cleaning cloth around the connection point before detaching hose connections. Reduce pressure by carefully releasing the connection point.
   
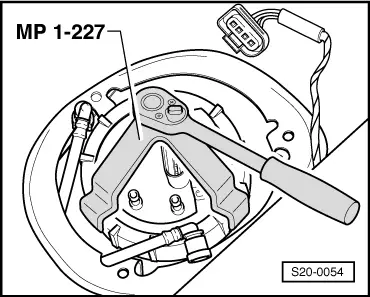
–  Unscrew union nut with wrench for union nut -MP1-227 (3217)-.
–  Pull the fuel delivery unit and the gasket ring out of the opening of the fuel tank.
  Note
When replacing the fuel delivery unit, empty the old fuel delivery unit before disposing of it.
Install
–  The installation of the fuel delivery unit occurs in the reverse order.
  Note
t  When installing, ensure that the float arm of the sender for fuel gauge display -G- is not bent.
t  Moisten the gasket ring of the flange with fuel before fitting.
t  Make sure the fuel hoses fit tightly.
  S20-0054
t  Pay attention to installed position of flange of fuel delivery unit: The marking on the flange must be aligned with the marking on the fuel tank -arrows-.
t  After installing the fuel delivery unit, check whether the feed, return-flow and vent lines are clipped in place on the fuel tank.
  A20-0096

Removing and installing the sender for fuel gauge displayG > < Extract fuel from the fuel tank