| –
| Switch off the ignition and all electrical components. |
| –
| Lower window sufficiently so that the screw of the clamping joint is in the opening of the assembly carrier. |
| –
| Release the screw of clamping joint → Chapter. |
| –
| Push the window up and secure with adhesive tape. |
| –
| Disconnect plug connection from window lifter motor. |
| –
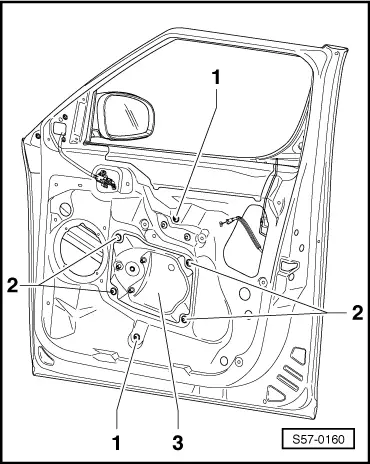
| Remove fixing screws -1- for assembly carrier (10 Nm). |
| –
| Remove fixing screws -2- for window lifter (10 Nm). |
| –
| Turn assembly carrier -3- and remove. |
| –
| Installation is carried out in the reverse order. |
| With mechanical window lifter |
| –
| Lower window sufficiently so that the screw of the clamping joint is in the opening of the assembly carrier. |
| –
| Release the screw of clamping joint → Chapter. |
| –
| Push the window up and secure with adhesive tape. |
| –
| Remove fixing screws -1- for window lifter (10 Nm). |
| –
| Remove fixing screws -2- for assembly carrier (10 Nm). |
| –
| Remove assembly carrier with window lifter. |
| –
| Installation is carried out in the reverse order. |
|
|
|
 Note
Note