| –
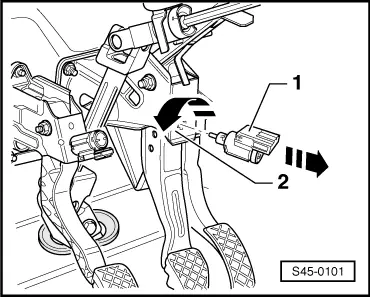
| Turn brake light switch -1- 45° to the left and remove from bracket -2-. |

Note | t
| The brake light switch may only be installed once to ensure that it has an adequately tight fit. |
| t
| Carry out assembly of the brake light switch after clipping the brake pedal with the brake servo unit → Chapter. |
| t
| Before assembling the brake light switch grease the contact surface of the pedal tappet with polycarbamide grease -G 052 142 A2-. |
| Pull the brake light switch tappet out completely up to its stop before assembly since it will be automatically adjusted and set during assembly. |
| –
| Guide the brake light switch through in the assembly opening and install by turning it 45° to the right. |
| Brake pedal always remains in the off position in this case (not actuated). |
| –
| After installing the brake light switch, check whether brake pedal is in the end position (release position). |
| –
| Mount plug on brake light switch. |
| –
| Checking the function of the brake light switch: |
|
| Actuate brake pedal ⇒ brake lights must light up. |
|
| Release brake pedal ⇒ brake lights must not go out. |
|
|
|
