skoda Workshop Repair Guides

Skoda Workshop Service and Repair Manuals

Climatronic - Air conditioner with automatic regulation - Part 1 > < Removing and installing control motor of fresh air flap and re-circulating air flapV154
Removing and installing the control motor of temperature flapV68
Removing and installing the control motor of temperature flap -V68-
  Note
On vehicles as of CW 46.2010, the temperature flap is mechanically operated via the flex shaft, see → Chapter.
Special tools and workshop equipment required
t  Measuring tool set, e.g. -V.A.G 1594 C-
Removing
–  Remove the centre console → Body Work; Rep. gr.68.
–  Removing the dash panel → Body Work; Rep. gr.70.
–  Remove left footwell vent.
   
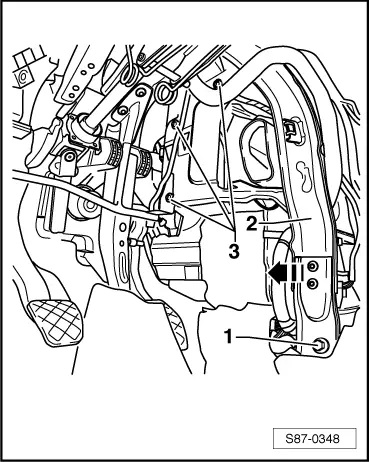
–  Release screws -3- (5 Nm) and screw -1- (20 Nm).
–  Slightly lever off the support -2--arrow- and fix it by wedging (e.g. wooden wedge).
  S87-0348
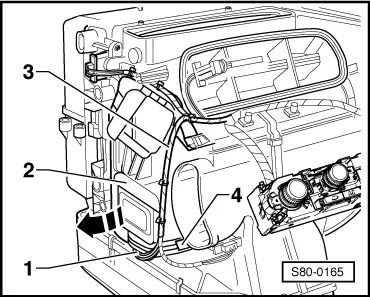
–  Unplug connector -1-.
–  Carefully detach the wiring harness -3- from the cable straps at the control motor of the temperature flap.
–  Press catch -4- slightly forwards, swivel holder with control motor -2- in -the direction of the arrow - and slide out of the front holders towards you.
–  Carefully pull holder with control motor through the opening between support and air conditioning unit downwards.
  S80-0165
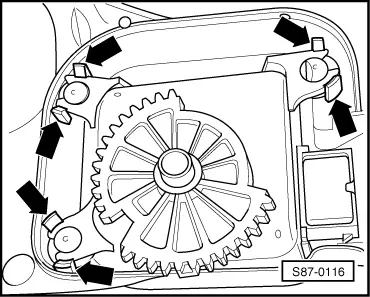
–  Remove control motor from the holder.
   To this end press the catch pegs -arrows- outwards while pushing the control motor out of the catches.
Install
  Note
The spare part control motor of the temperature flaps is on position „temperature flap closed“.
–  Press control motor into the holder.
  S87-0116
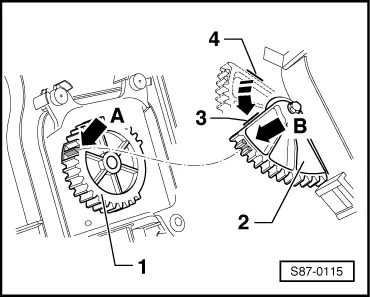
–  Mark the top -4- and bottom -3- stop on the gear segment -2- on the housing with a marker.
–  Position gear segment -2- in -the direction of the arrow- on the bottom stop -3-.
–  Mark „short“ tooth face of the control motor gear wheel -1- with marker -arrow A-.
–  Mark the side of the tooth opening of the short teeth of gear segment -2- with marker -arrow B-.
–  Insert the holder with control motor in the front brackets and slide onto the housing in such a way that the tooth -arrow A- engages in the tooth opening -arrow B-.
Functional test
–  Insert plug of the control motor of temperature flap.
  S87-0115
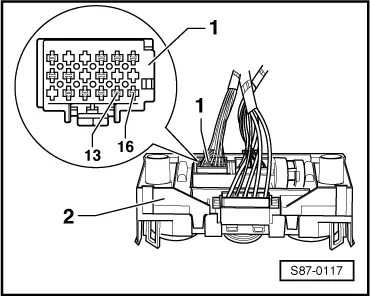
–  Remove plug -1- from the heating and air conditioning system control -2-.
–  Connect battery voltage to contacts 13 and 16 of plug -1- with auxiliary lines from measuring tool set -V.A.G 1594 C- and check control motor running.
  S87-0117
 Contact assignment
 1316
Control motor runs in position „cold“ (gear segment down)-+
Control motor runs in position „warm“ (gear segment up)+-

  Note
   
t  During the above test the control motor must smoothly switch the temperature flap to the top -4- and bottom -3- stop.
t  If there are functional problems abort test immediately, remove again control motor with holder and repeat installation.
–  Further installation occurs in reverse order.
–  If the control motor was replaced, perform a basic setting → Vehicle diagnostic, testing and information system VAS 5051
  S87-0115

Climatronic - Air conditioner with automatic regulation - Part 1 > < Removing and installing control motor of fresh air flap and re-circulating air flapV154