skoda Workshop Repair Guides

Skoda Workshop Service and Repair Manuals

Removing and installing parts of the heater unit - Part 2 > < Removing and installing flex shafts
Removing and installing heat exchanger
Special tools and workshop equipment required
t  Hose clamps -MP7-602 (3094)-
Removing
  DANGER!
The coolant temperature can be over 100 °C when the engine is warm. The cooling system is under pressure - risk of scalding!
Before repairs, reduce pressure and temperature if necessary.
–  Unscrew battery earth strap → Electrical System; Rep. gr.27.
–  Remove the centre console → Body Work; Rep. gr.68.
–  Reduce pressure in the coolant circuit by opening the cap on the coolant reservoir.
   
–  Use hose clamps -MP 7-602 (3094)-- to pinch off coolant hoses of heat exchanger (if not possible, drain coolant).
–  Place cleaning cloth below heat exchanger connection to collect drained coolant.
–  Detach coolant hoses -2- and -3-.
–  Carefully blow coolant out of the heat exchanger with compressed air.
   To do so connect up the hose with compressed air on the connection fitting for the feed and attach the container under the connection fittings for return flow.
–  Unscrew screw -arrow- (20 Nm) and lay connection fitting for heat exchanger -1- to the front.
For vehicles with heating element for additional air heating -Z35-
–  Separate plug connection of the auxiliary heating to the vehicle wiring loom on left or heater unit.
–  Unscrew nut (10 Nm) and unscrew the earth cable of the auxiliary heating under the distributor housing.
Continued for all vehicles
  S80-0103
–  Remove connecting part for rear duct -3-.
–  Lever off retaining clips -1- on right, on left and at rear.
–  Lower bottom part of distributor housing with heat exchanger -2- at the rear and pull out of the front catch towards the rear.
–  Carefully swivel out bottom part of distributor housing to the right -arrow-.
–  Take heat exchanger out of the bottom part of distributor housing.
For vehicles with heating element for additional air heating -Z35-
–  Carefully remove heating element for additional air heating -Z35- upwards from the bottom part of distributor housing.
Install
Installation is carried out in the reverse order. Pay attention to the following:
–  Moisten sealing lips of the gasket in bulkhead (assembly plate) - heat exchanger with a neutral soapy solution before installing the heat exchanger (easier mounting).
  S80-0156
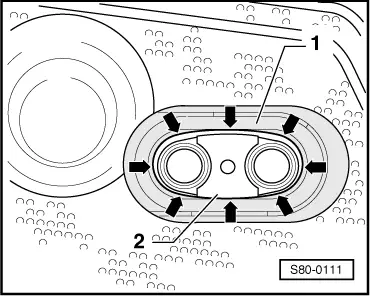
–  Carefully press gasket -1- in the bulkhead (assembly plate) from the outside into the groove of the connection fitting -2- of the heat exchanger -arrows-.
–  Replace O-rings at connection fitting of heat exchanger.
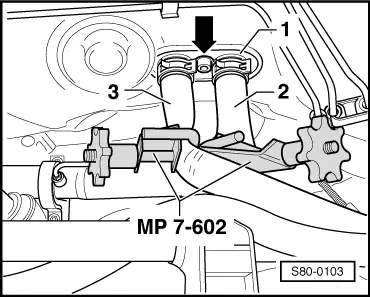
–  Connect coolant hoses the right way round.
   In direction of travel
on the left: Feed
on the right: Return flow
  Note
If the heat exchanger is replaced, drain the entire coolant and fill system with fresh coolant.
–  Inspect coolant level, top up with coolant if necessary.
–  Pay attention to the sequence when connecting the battery earth strap → Electrical System; Rep. gr.27.
  S80-0111

Removing and installing parts of the heater unit - Part 2 > < Removing and installing flex shafts