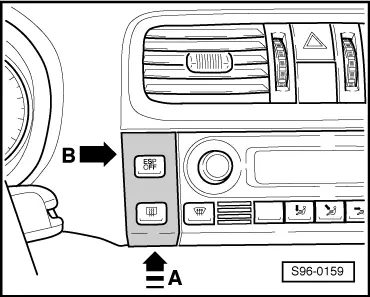
skoda Workshop Repair Guides

Skoda Workshop Service and Repair Manuals

Removing and installing control motor of fresh air flap and re-circulating air flapV154 > < Removing and installing parts of the heater unit - Part 2
Removing and installing heater unit
Removing
–  Remove heat exchanger → Chapter.
   
–  Slightly press the cover -arrow A- and slacken the cover at the top and at the bottom catch using a small screwdriver or a disassembly wedge -3409--arrow B-. Slacken the cover on the right side of the heater control in the same way.
  S96-0159
–  Remove centre dash panel -6-.
–  Press off carefully the trim panel -5- to the heater control and release the screws -7- (1 Nm).
–  Slightly press together the catches in the corners and fit the heater control into the dash panel.
–  Removing the dash panel → Body Work; Rep. gr.70.
–  Remove the intermediate piece for the defroster duct (2 securing pins) and intermediate piece for dash panel vents (2 retaining clips).
–  Push out bracket for main wiring loom with wiring loom of the heater unit support and unclip the wiring loom from the heater unit.
–  Vehicles with electrical auxiliary heating - unclip wiring loom from rear left heater unit.
–  Separate the plug connection to the left vehicle wiring loom next to the fresh air blower.
  S80-0151
–  Release screw -4- (1.5 Nm) and remove left footwell vent -3-.
–  Removing the convenience system central control unit -J393- → Electrical System; Rep. gr.97.
–  Push holder -1- for central control unit for convenience system at the top outwards and slide out of the support in -the direction of the arrow-.
–  Remove cornering light and headlight range control unit -J745- → Electrical System; Rep. gr.94.
–  Remove fresh air blower -V2- → Chapter.
–  Release screws -2- (5 Nm).
  S80-0094
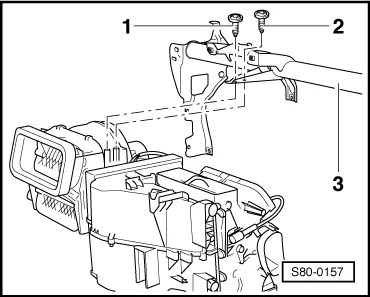
–  Release screws -1- and -2- (5 Nm) from the central pipe -3-.
–  Slightly tilt out bottom part of heater unit and press off the damping insulation at the intake air passage by hand.
–  Lower right heater unit and carefully remove heater unit.
Install
Installation is carried out in the reverse order. Pay attention to the following:
–  Observe sequence when installing the heat exchanger → Chapter.
  S80-0157

Removing and installing control motor of fresh air flap and re-circulating air flapV154 > < Removing and installing parts of the heater unit - Part 2