
Fabia Mk2
| Timing belt - Summary of components |
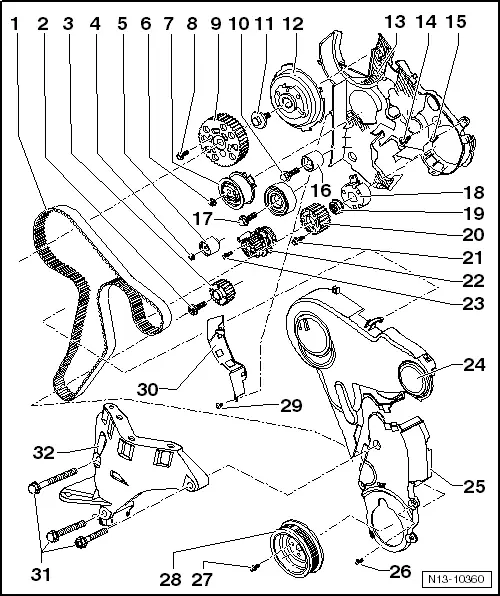
| 1 - | Toothed belt |
| q | before removing mark running direction |
| q | check for wear |
| q | do not kink |
| q | removing and installing → Chapter |
 Note
Note| If the toothed belt is replaced when carrying out engine repair (apart from regular change interval), it should be entered in the → Service Schedule! |
| 2 - | 120 Nm + torque a further 90° (1/4 turn) |
| q | replace |
| q | Neither oil nor grease thread or collar. |
| q | tightening may occur in successive stages |
| 3 - | Toothed belt gear |
| q | at the crankshaft |
| 4 - | 20 Nm |
| 5 - | Guide pulley, bottom |
| 6 - | 20 Nm + torque a further 45° (1/8 turn) |
| 7 - | Tensioning pulley |
| q | pay attention to different versions → Fig. |
| q | for removing and installing, remove engine support → Chapter |
| 8 - | 20 Nm + torque a further 45° (1/8 turn) |
| q | replace |
| 9 - | Toothed belt gear |
| q | on the camshaft |
| 10 - | 20 Nm |
| 11 - | 100 Nm |
| q | to release and tighten use counterholder -T10051- |
| 12 - | Hub |
| q | for camshaft |
| q | to remove use extractor -T10052- |
| q | removing and installing → Chapter |
| 13 - | Rear toothed belt guard |
| 14 - | 20 Nm + torque a further 45° (1/8 turn) |
| q | replace |
| q | for attaching the high pressure pump |
| 15 - | 20 Nm + torque a further 180° (1/2 turn) |
| q | Double screw |
| q | replace |
| 16 - | Guide pulley, top |
| q | attached to the bracket for auxiliary units |
| 17 - | 50 Nm + torque a further 90° (1/4 turn) |
| q | replace |
| q | for guide pulley, middle (without position number) |
| q | screwed into the bracket for auxiliary units |
| 18 - | Hub |
| q | for high pressure pump |
| q | to release and tighten use counterholder -T10051- |
| q | to remove use extractor -T40064- |
| q | removing and installing → Chapter |
| 19 - | 95 Nm |
| 20 - | Toothed belt gear |
| q | on the high pressure pump |
| 21 - | 20 Nm |
| 22 - | Coolant pump |
| q | removing and installing → Chapter |
| 23 - | 15 Nm |
| 24 - | Timing belt guard - top part |
| 25 - | Timing belt guard - bottom part |
| q | removing and installing → Fig. |
| 26 - | 10 Nm |
| q | apply locking agent -D 000 600 A2- before installing |
| 27 - | 10 Nm + torque a further 90° (1/4 turn) |
| q | replace |
| 28 - | Crankshaft-belt pulley |
| q | with vibration damper |
| q | removing and installing → Chapter |
| 29 - | 5 Nm |
| 30 - | Protection plate |
| 31 - | Screw |
| q | replace |
| q | tightening order and tightening torque → Chapter |
| 32 - | Engine support bracket |
| q | removing and installing → Chapter |

|

|