skoda Workshop Repair Guides

Skoda Workshop Service and Repair Manuals

Removing and installing the cylinder head > < Cylinder head - summary of components
Removing and installing camshaft housing
Special tools and workshop equipment required
t  Counterholder -T30004 (3415)- with replaceable bolts -T30004/1 -
t  Camshaft lock -T10016-
t  Extractor -T10094 A-
t  Sealant remover gasket stripper (bearing code GST, bearing article no. R 34402), manufacturer Retech s.r.o.
t  Cleaning and degreasing agent, e.g. -D 009 401 04-
t  Sealant -D 188 003 A1-
t  Protective goggles and gloves
Removing
  Note
t  
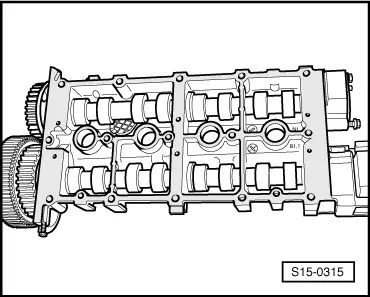
The camshafts are located in the camshaft housing. This is why the camshaft housing must only be removed once the two toothed belts have been removed.
t  Do not rework the sealing surface of the camshaft housing.
t  Removing and installing camshafts → Chapter.
–  Remove the air filter housing → Chapter.
–  Removing both timing belts → Chapter.
   
–  Unscrew earth cable from camshaft housing -arrow-.
–  Removing ignition coils → Chapter.
–  Remove guide with wiring loom from camshaft housing.
–  Remove the coolant ventilation line from the camshaft housing.
–  Disconnect the 3-pin plug from the hall sender.
–  Release the fixing screw for the rear toothed belt guard near the right lifting eye.
–  Slacken the screws for the cylinder head housing crosswise from outside to inside and unscrew.
–  Carefully remove the camshaft housing.
–  Remove the roller rocker arms together with the hydraulic balancing elements and lay aside on a clean surface. Make sure that the roller rocker arms and the hydraulic balancing elements are not interchanged.
Install
l  The pistons must not be positioned at top dead centre.
l  The crankshaft - toothed belt sprocket is secured to the crankshaft with fixing screw and two washers.
l  Lock the camshaft sprockets with camshaft lock -T10016- in the fit holes in the camshaft housing and secure them against turning → Fig..
  Note
When turning the camshaft the valves may touch the piston in TDC.
  WARNING
Wear protective gloves when working with sealant and grease remover!
–  Remove residual sealant on the cylinder head and on the camshaft housing using a chemical sealant remover.
–  Ensure that no dirt and sealant residues get into the cylinder head.
–  Degrease the sealing surfaces.
  S15-0345
–  Apply a thin coating of sealant -D 188 003 A1- uniformly on the clean sealing surface of the camshaft housing (see grid surfaces in the illustration).
  Note
The sealant must not be applied too thickly, as otherwise excess sealant may penetrate into the oil bores and possibly cause engine damage.
  S15-0315
–  Make sure all roller rocker arms are correctly positioned on the valve stem ends -1- and on the relevant hydraulic balancing elements -2-.
–  When installing, screw 2 pin screws (M6 x 70) into the cylinder head in order to guide the camshaft housing.
  S15-0332
–  Carefully place the camshaft housing at right angles to the cylinder wall onto the pin screws -arrows- and dowel pins of the cylinder head.
  S15-0323
–  Tighten the new fixing screws of the camshaft housing diagonally and evenly from the inside to the outside. Tightening torque 10 Nm + torque a further 1/4 turn (90°).
  WARNING
The camshaft housing must not tilt!
  Note
t  After installing the camshaft housing, allow the sealant to dry for about 30 minutes.
t  After installing new hydraulic balancing elements, the engine must not be started for about 30 minutes. The hydraulic balancing elements must „settle“ (otherwise the valves would strike the pistons).
The further assembly is carried out in reverse order to disassembly.
  A15-10587

Removing and installing the cylinder head > < Cylinder head - summary of components