
Octavia Mk1
|
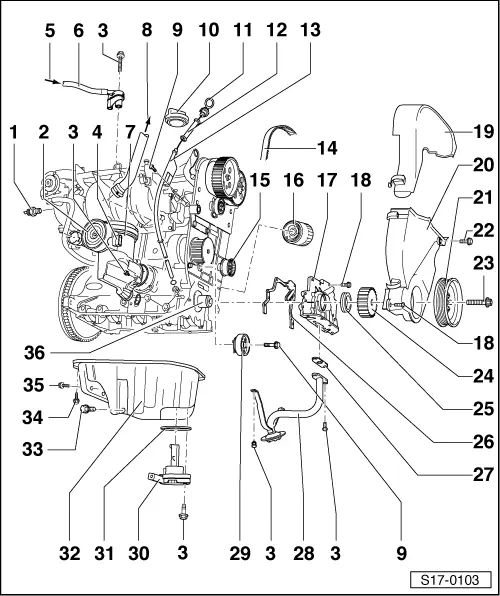
| 1 - | Oil pressure switch 0.03...0.07 MPa (0.3...0.7 bar) -F1-, 25 Nm |
| q | Identification: green |
| q | check → Chapter. |
| q | Replace gasket ring if leaking |
| 2 - | PCV valve |
| q | for engine with engine identification characters BCA |
| 3 - | 10 Nm |
| 4 - | Heating resistor for crankcase ventilation - N79- |
| q | for engine with engine identification characters BCA |
| 5 - | From air filter |
| 6 - | Non-return valve |
| q | from 01.02 |
| 7 - | Oil separator |
| q | only the version for engine with identification characters BCA is illustrated |
| 8 - | To air filter |
| 9 - | 20 Nm |
| 10 - | Cap |
| q | Replace seal if damaged |
| 11 - | Dipstick |
| q | oil level must not exceed max-marking! |
| 12 - | Filler funnel |
| q | Remove for extracting oil |
| 13 - | Guide tube |
| 14 - | Coupling drive-toothed belt |
| q | removing and installing, tensioning → Chapter. |
| q | check for wear |
| q | do not kink |
| 15 - | Guide pulley |
| 16 - | Oil filter |
| q | tighten by hand |
| q | pay attention to installation instructions on oil filter |
| 17 - | Oil pump |
| q | when fitting pay attention to the driver on the crankshaft → Anchor |
| q | must be positioned on dowel sleeves |
| q | removing and installing → Chapter |
| 18 - | 12 Nm |
| 19 - | Top toothed belt guard |
| 20 - | Bottom toothed belt guard |
| 21 - | Belt pulley |
| q | when assembling pay attention to correct installation |
| q | Removing and installing ribbed V-belt → Chapter. |
| 22 - | 20 Nm |
| 23 - | 90 Nm + torque a further 1/4 turn (90 °) |
| q | replace |
| q | moisten with oil before inserting |
| q | tightening may occur in successive stages |
| q | the torquing angle can be measured with a commercially available angle measuring plate, e.g. -Hazet 6690- |
| 24 - | Timing belt gear - crankshaft |
| 25 - | Gasket ring |
| q | replace → Chapter. |
| 26 - | Gasket |
| q | replace |
| q | must be positioned on dowel sleeves |
| 27 - | Gasket |
| q | replace |
| 28 - | Suction line |
| q | Clean strainer if dirty |
| 29 - | Timing belt tensioning pulley |
| q | Tension timing belt → Chapter. |
| 30 - | Oil level and oil temperature sender -G266- |
| q | check → Current flow diagrams and Fitting locations |
| 31 - | Gasket |
| q | replace if damaged |
| 32 - | Oil pan |
| q | removing and installing → Chapter |
| q | clean sealing surface before installing |
| q | install with silicone sealant -D 176 404 A2- |
| 33 - | Oil drain plug, 30 Nm |
| 34 - | 13 Nm |
| q | slacken and tighten only the bolts at the flywheel side with socket wrench SW5, e. g. -3249- |
| 35 - | 45 Nm |
| 36 - | Driver |
| q | coat with oil before installing the oil pump |