skoda Workshop Repair Guides

Skoda Workshop Service and Repair Manuals

Disassembling and assembling pistons and conrods > < Removing and installing drive plate
Removing and installing the sealing flange on the belt pulley side
Special tools and workshop equipment required
t  Counterholder -MP 1-310- or -T30004 -
t  Insertion sleeve from -MP 1-314-
t  Silicone sealant -D 176 404 A2-
Removing
–  Remove V-ribbed belt → Chapter.
–  Removing toothed belt → Chapter.
   
–  Remove timing belt gear from the crankshaft. To this end lock the toothed belt gear with counterholder -MP 1-310 - or -T30004-.
  Note
When screwing on the counterholder place -MP 1-310- 2 washers between the timing belt gear and the counterholder.
–  Drain engine oil.
–  Removing the oil pan → Chapter.
–  Unscrew sealing flange on belt pulley side.
–  Remove sealing flange, if necessary release by applying slight blows with a rubber-headed hammer.
–  Use a flat scraper to remove sealant residues on the cylinder block.
  S13-0156
–  Use a rotating plastic brush to remove sealant residues on the sealing flange (wear protective goggles).
–  Clean sealing surfaces, they must be free of oil and grease.
Install
  Note
The sealing flange must be installed within 5 minutes after applying the silicone sealant.
  S17-0130
–  Cut off nozzle tube at the front marking (Ø of nozzle approx. 3 mm).
t  Thickness of sealant bead -arrows-: 2 ... 3 mm
  Note
The sealant bead must not be thicker than 3 mm otherwise excess sealant may get into the oil pan and clogg the strainer in the oil suction pipe.
  N17-0019
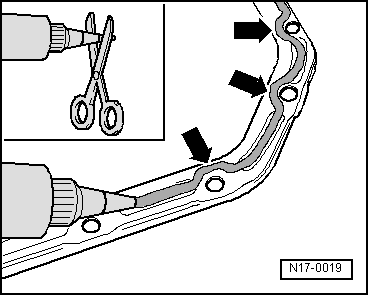
–  Apply silicone sealant bead to the clean sealing surface of the sealing flange, as shown in the illustration.
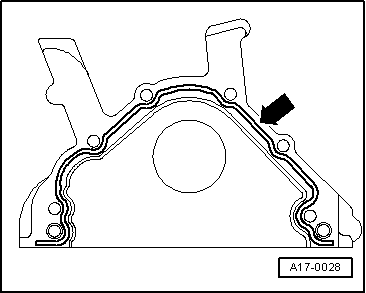
–  Fit sealing flange immediately and lightly tighten all bolts.
  Note
t  For version with PTFE gasket ring, the crankshaft stub must be free of oil and grease and the gasket ring must not be oiled.
t  When installing the sealing flange with the gasket ring fitted use the insertion sleeves:
t  - Elastomer gasket ring - -MP 1-314 -
t  - PTFE gasket ring - -T10053/1-
–  Tighten screws to 15 Nm.
–  Installing the oil pan → Chapter.
  Note
After installing, allow the sealant to dry for about 30 minutes. Only then may engine oil be filled in.
–  Installing the timing belt → Chapter.
  A17-0028

Disassembling and assembling pistons and conrods > < Removing and installing drive plate