skoda Workshop Repair Guides

Skoda Workshop Service and Repair Manuals

Self-diagnosis II > < Test conditions
Procedure
Procedure
   
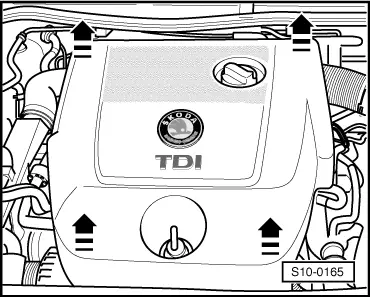
–  Remove engine trim panel in -direction of the arrow-.
–  Connect vehicle system tester -V.A.G 1552-. Start engine and enter address word 01 “Engine electronics” → Chapter.
–  Enter function 03 “Final control diagnosis”.
  S10-0165
Readout on display:
The actuation of the valve is interrupted and the valve must click for approx 30 seconds.
  Note
If the engine is cold, the interrupted actuation of the valve can lead to clearly audible engine running fluctations. The clicking of the valve cannot be heard because of the engine noise and due to the engine vibrations it can only be checked by touching. Check again the valve when the ignition is switched on.
If the valve does not click:
–  Testing Exhaust gas recirculation valve -N18 - → Chapter.
–  Press .
 
Actuator diagnosis                    ->
Exhaust gas recirculation valve -N18
Readout on display:
The deactivation of the AC compressor is checked.
This test step is also activated on vehicles without AC system, do not pay attention to this test.
The AC compressor must switch off periodically every 5 seconds and start running again.
If the compressor does not switch off:
–  Test signal from the air conditioning system → Chapter.
–  Press .
 
Actuator diagnosis                    ->
AC compressor engagement
Readout on display:
The actuation of the valve is interrupted and the valve must click for approx 30 seconds.
  Note
The clicking of the valve cannot be heard because of the engine noise and due to the engine vibrations it can only be checked by touching. Check again the valve when the ignition is switched on.
If the valve does not click:
–  Inspect charge pressure control solenoid valve -N75 - → 1.9/74 TDI Engine, Mechanics; Rep. Gr.21.
–  Press .
For engine with engine code AXR
 
Actuator diagnosis                    ->
Charge press.control solenoid valve -N75
Readout on display:
The engine must stop.
If the engine does not stop:
–  Switch off ignition.
–  Testing Intake manifold flap motor -V157- → Chapter.
For engine with engine code ATD
 
Actuator diagnosis                    ->
Intake manifold flap motor -V157
Readout on display:
The engine must stop.
If the engine does not stop:
–  Switch off ignition.
–  Test the change-over valve for intake manifold flap -N239- → Chapter.
Continued for all engines
–  Continue final control diagnosis with the engine off and the ignition switched on.
–  Press .
 
Actuator diagnosis                    ->
Intake manif.flap change-over valve-N239
Readout on display:
The warning light for glow period must flash for about 30 seconds.
If the warning light for glow period does not flash:
–  Test glow period warning light - K29 - → Electrical System; Rep. Gr. 90.
–  Press .
 
Actuator diagnosis                    ->
Glow period warning lamp -K29
Readout on display:
Radiator fan control unit -J293- switches the radiator fan on and off for 30 seconds.
The vehicles with front-wheel drive without air conditioning system are not fitted with the radiator fan control unit -J293-, do not pay attention to this test.
If the fan does not run:
–  Test radiator fan control unit -J293- and radiator fan -V7- → Current flow diagrams and Fitting locations.
–  Press .
 
Actuator diagnosis                    ->
Radiator fan control
Readout on display:
The relay must be activated for approx. 30 seconds (click).
It is also possible to observe the relay switching on and off by the interior light becoming brighter and darker (caused by the high power consumption of glow plugs).
If the relay does not click:
–  Test glow plug relay -J52- → Current flow diagrams and Fitting locations.
–  Press .
 
Actuator diagnosis                    ->
Glow plug relay -J52
Readout on display:
The relay must be activated for approx. 30 seconds (click).
If the relay does not click:
–  Test low heat output relay -J359- → Current flow diagrams and Fitting locations.
–  Press .
 
Actuator diagnosis                    ->
Low heat output relay -J359
Readout on display:
The relay must be activated for approx. 30 seconds (click).
If the relay does not click:
–  Test high heat output relay -J360 - → Current flow diagrams and Fitting locations.
–  Press .
 
Actuator diagnosis                    ->
High heat output relay          -J360
Readout on display:
The fault lamp must flash.
If the fault lamp does not flash:
–  Check fault lamp → Current flow diagrams and Fitting locations.
–  Press .
 
Actuator diagnosis                    ->
Fault lamp
Readout on display:
–  Select function 06 “End output” and confirm with Q.
 
Vehicle system test                 HELP
Select function XX

Self-diagnosis II > < Test conditions