skoda Workshop Repair Guides

Skoda Workshop Service and Repair Manuals

Exhaust turbocharger, G-charger > < Removing and installing the fuel gauge sender
Removing and installing the fuel tank
Special tools and workshop equipment required
t  Fuel extraction device (e.g. -V.A.G 1433 A-)
t  Engine/gearbox jack (e.g. -V.A.G 1383 A -)
Removing
–  Empty fuel tank with fuel extraction equipment (e. g. -V.A.G 1433 A -).
–  Remove rear axle: → Chassis; Rep. Gr.42
–  Unscrew cover (below rear seat).
–  Disconnect the connector for the fuel gauge.
–  Open the fuel tank cap, lever out tensioning ring with rubber bowl (around filler neck).
–  Press in rubber bowl.
–  Remove outer rear right wheelhouse liner.
–  Release 2 screws for tank filler neck from wheelhouse.
   
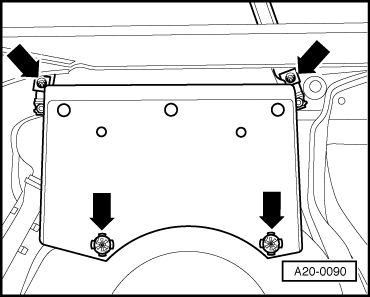
–  Remove cover below the fuel tank -arrows- (not fitted to all vehicles).
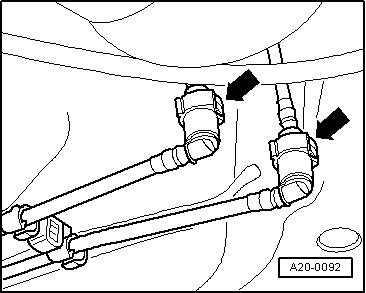
–  Disconnect 2 right front fuel hoses at fuel tank:
  A20-0090
–  To do so press down the buttons on the hose couplings -arrows-.
t  black = intake hose
t  blue = return-flow hose
–  Position engine/gearbox jack (e. g. -V.A.G 1383 A -) below the fuel tank for supporting.
  A20-0092
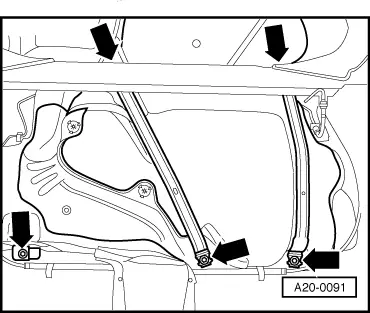
–  Detach bolted connections -arrows- at front left and at the retaining straps.
–  Lower the fuel tank.
Install
–  Refit heat shield from the old fuel tank onto the new fuel tank.
  A20-0091

Exhaust turbocharger, G-charger > < Removing and installing the fuel gauge sender