skoda Workshop Repair Guides

Skoda Workshop Service and Repair Manuals

Testing hydraulic bucket tappets > < Replacing camshaft gasket ring
Removing and installing camshaft
Special tools and workshop equipment required
t  Counterholder -T30004 -
t  Sealant -AMV 174 004 01-
Removing
–  Remove engine cover → Chapter.
–  Remove intake manifold - top part → Chapter.
  Note
t  The coolant hoses can remain connected to the throttle valve control unit (if necessary unscrew throttle valve control unit).
t  Seal intake passages with a clean cloth.
–  Remove top toothed belt guard.
   
–  Position camshaft sprocket to TDC marking of cylinder 1 by rotating at crankshaft. Marking on camshaft sprocket must be aligned with arrow on the toothed belt guard.
–  Slacken tensioning pulley and take off timing belt.
–  Turn crankshaft slightly back.
  A13-0077
–  Remove camshaft sprocket.
Hold the camshaft sprocket tight with counterholder -T30004- to slacken the bolt (first of all release screws -arrows-).
–  Remove Woodruff key from the camshaft.
–  Remove cylinder head cover.
–  First remove bearing caps 5, 1 and 3. Release bearing caps 2 and 4 alternately and crosswise.
Install
Condition
l  The pistons must not be at TDC.
  Note
t  When fitting the camshaft the cams of cylinder 1 must point upwards.
  S15-0143
t  When installing the bearing caps pay attention to the centre displacement of the bores. Before installing the camshaft fit bearing cap and determine the fitting position.
–  Oil contact surfaces of camshaft.
–  Insert camshaft.
–  Screw in bearing caps 2 and 4 alternately crosswise and tighten to 20 Nm.
–  Lightly coat bearing cap contact surface 1 with sealant -AMV 174 004 01 -.
–  Install bearing caps 3, 1 and 5 and also tighten to 20 Nm.
–  Set the Woodruff key in the camshaft.
  V15-0098
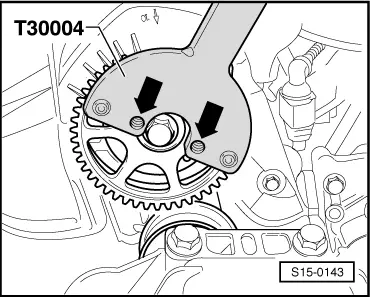
–  Install camshaft sprocket.
–  Hold the camshaft sprocket tight with counterholder -T30004- to tighten the bolt (first of all release screws -arrows-).
Tightening torque: 100 Nm
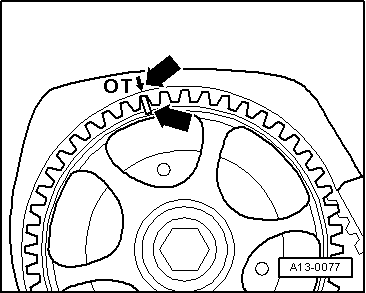
  Note
When rotating the camshaft, the crankshaft must not be positioned at TDC for any one piston. Risk of damaging valves and piston crowns.
Further installation occurs in reverse order to removal.
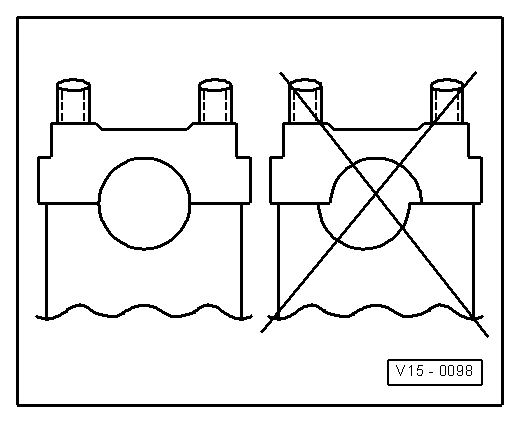
–  Install and tension timing belt → Chapter.
  Note
After installing the camsaft, the engine must not be started for about 30 minutes. The hydraulic clearance compensation elements must settle (otherwise valves would strike the pistons).
  S15-0143

Testing hydraulic bucket tappets > < Replacing camshaft gasket ring