| Removing and installing sealing flange and flywheel |
| For engine with identification characters AEG, APK, AQY and AZH |

Note | t
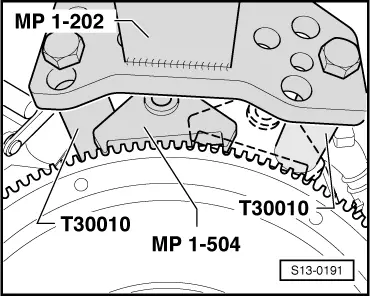
| Secure the engine with engine mount -MP 1-202 - and distance sleeves -T30010- on the assembly stand before performing assembly work. |
| –
| 90 Nm + torque a further 90° (1/4 turn) |
| –
| Fit bolt in original condition, do not oil or grease |
| –
| to release and tighten the counterholder -MP 1-310- or -T30004- use |
| –
| when bolting on counter-holder -MP 1-310-, place 2 washers between timing belt sprocket and counter-holder |
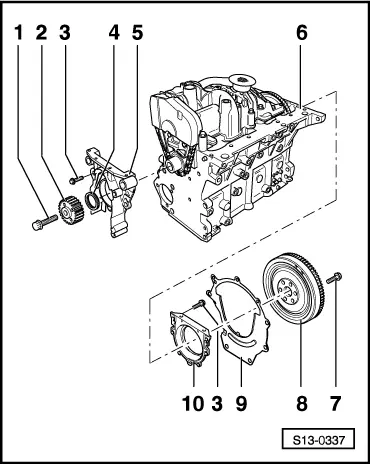
| 2 - | Toothed belt sprocket - crankshaft |
| –
| can be installed only in one position |
| –
| Removing and installing, tightening the timing belt → Chapter |
| –
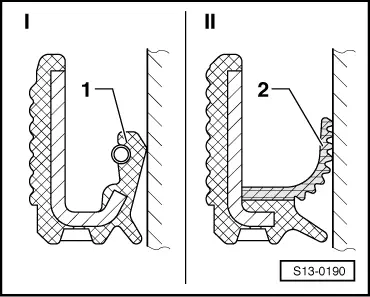
| pay attention to different version → Fig. |
| –
| must be positioned on dowel sleeves |
| –
| removing and installing crankshaft → Chapter |
| –
| Disassembling and assembling piston and conrod → Chapter |
| 7 - | 60 Nm + torque a further 90° (1/4 turn) |
| –
| tightening may occur in successive stages |
| –
| same tightening torque for drive plate |
| –
| assembly only possible in one position -holes offset- |
| –
| lock flywheel with flywheel lock -MP 1-504 - for removing and installing → Fig. |
| –
| removing and installing drive plate → Chapter |
| –
| must be positioned on dowel sleeves |
| –
| do not damage/bend during assembly work |
| –
| hang on the sealing flange → Fig. |
| 10 - | Sealing flange with PTFE gasket ring |
| –
| to remove and install, take off oil pan → Chapter |
| –
| must be replaced completely |
| –
| only mount sealing flange with PTFE gasket ring (polytetrafluorethylen) |
| –
| install gasket ring dry, the crankshaft stub must be free of oil |
| –
| install new sealing flange with guide sleeve (do not pull guide sleeve off the seal before installing) |
| For engine with engine code AZJ |
Note | t
| Secure the engine with engine mount -MP 1-202 - and distance sleeves -T30010- on the assembly stand before performing assembly work. |
| –
| 90 Nm + torque a further 90° (1/4 turn) |
| –
| Fit bolt in original condition, do not oil or grease |
| –
| to release and tighten the counterholder -MP 1-310- or -T30004- use |
| –
| when bolting on counter-holder -MP 1-310-, place 2 washers between timing belt sprocket and counter-holder |
| 2 - | Toothed belt sprocket - crankshaft |
| –
| can be installed only in one position |
| –
| Removing and installing, tightening the timing belt → Chapter |
| –
| pay attention to different version → Fig. |
| –
| must be positioned on dowel sleeves |
| –
| removing and installing crankshaft → Chapter |
| –
| Disassembling and assembling piston and conrod → Chapter |
| 7 - | 60 Nm + torque a further 90° (1/4 turn) |
| –
| tightening may occur in successive stages |
| –
| same tightening torque for drive plate |
| –
| assembly only possible in one position -holes offset- |
| –
| lock flywheel with flywheel lock -MP 1-504 - for removing and installing → Fig. |
| –
| removing and installing drive plate → Chapter |
| –
| must be positioned on dowel sleeves |
| –
| do not damage/bend during assembly work |
| –
| hang on the sealing flange → Fig. |
| 10 - | Sealing flange with PTFE gasket ring |
| –
| to remove and install, take off oil pan → Chapter |
| –
| must be replaced completely |
| –
| only mount sealing flange with PTFE gasket ring (polytetrafluorethylen) |
| –
| install gasket ring dry, the crankshaft stub must be free of oil |
| –
| install new sealing flange with guide sleeve (do not pull guide sleeve off the seal before installing) |
|
|
|