Skoda Workshop Service and Repair Manuals
HOME
FEATURES
MENU
INDEX
ABOUT US
Connecting remote control >
< Removing and installing the fuel gauge sender G
Octavia Mk1
Power unit
1,6/74; 75 kW MPI engine
Fuel supply, gas operation / Removing and installing parts of the fuel supply system
Removing and installing the fuel tank
Removing and installing the fuel tank
Removing and installing the fuel tank
Observe safety measures
→ Chapter
.
Observe rules for cleanliness
→ Chapter
.
Special tools and workshop equipment required
t
-Motor-/Getriebeheber-, e. g. -V.A.G 1383 A-
t
Fuel extraction device, e. g. -VAS 5190-
t
Wrench for union nut -MP1-227 (3217)-
Condition
l
Fuel tank must be empty.
Removing
–
Drain the fuel tank
→ Chapter
.
–
Unscrew cover (below rear seat).
–
Unlock and disconnect 4-pin plug from flange at fuel tank.
–
Unscrew securing bolt and remove fuel filler flap unit with rubber bowl.
–
Remove rear right wheelhouse liner.
–
Unscrew tank filler neck.
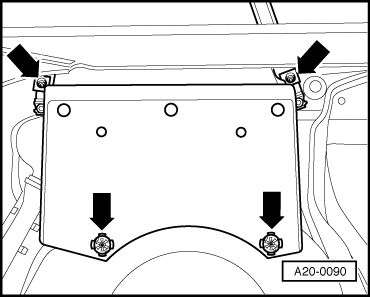
–
Remove cover below fuel tank
-arrows-
(if fitted).
–
Removing rear axle
→ Chassis; Rep. gr.42
.
–
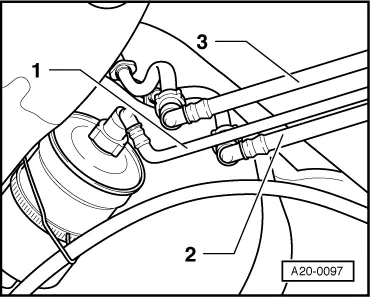
Separate return-flow line
-2-
(blue), feed line
-1-
(black) and vent line
-3-
(white) at front right of fuel tank (press release button).
–
Position engine/gearbox jack, e.g. -V.A.G 1383 A-, below the fuel tank for support.
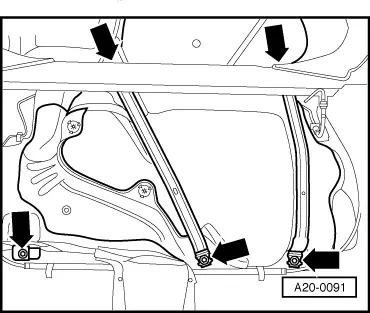
–
Detach bolted connections
-arrows-
at front left and at the retaining straps.
–
Lower the fuel tank.
Install
Installation is performed in the reverse order, pay attention to the following points:
–
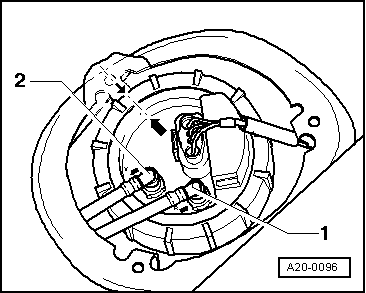
Connect the fuel lines to the flange of the fuel delivery unit:
t
Blue return-flow line „1“ on the connection with the marking
-R-
.
t
Black feed line „2“ on the connection with the marking
-V-
.
Power unit
1,6/74; 75 kW MPI engine
Fuel supply, gas operation / Removing and installing parts of the fuel supply system
Removing and installing the fuel tank
Connecting remote control >
< Removing and installing the fuel gauge sender G