Roomster
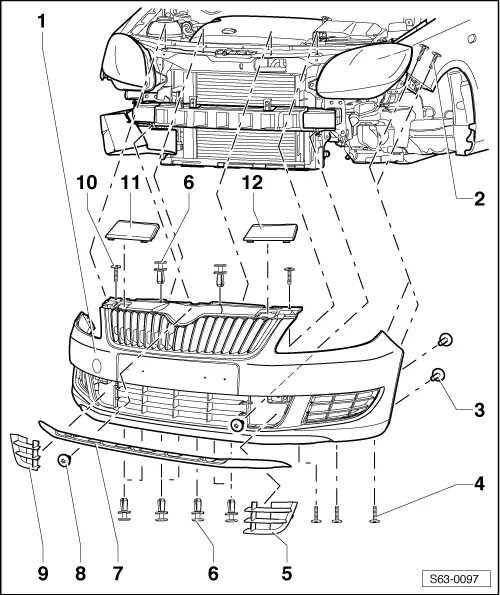
| Summary of components of front bumper (as of 03.2010 - Facelift) |

| 1 - | Front bumper |
| Removing: |
| – | Switch off the ignition and all electrical components. |
| – | Partly remove front wheelhouse liner → Chapter. |
| – | Lever out cover parts (Pos. 5 and 9). |
| – | Remove screws (Pos. 2). |
| – | Remove screws (Pos. 3). |
| – | Remove expanding rivets (Pos. 6). |
| – | Remove screws (Pos. 4). |
| – | Remove screws (Pos. 8). |
| – | Remove screws (Pos. 10). |
| – | Remove bumper (Pos. 1) to the front. |
 Note
Note| Before removing the bumper it is necessary to disconnect plug of fog lights, of park sensors and of hoses for the headlight cleaning system (if present). |
| Installing: |
| – | Installation is carried out in the reverse order. |
| 2 - | 3.5 Nm |
| 3 - | 1 Nm |
| 4 - | 1.5 Nm |
| 5 - | Left cover part |
| Removing: |
| – | Carefully lever off cover part e.g. with disassembly wedge -3409-. |
| Installing: |
| – | Lock cover part into position in the bumper. |
| 6 - | Body-bound rivet |
| 7 - | Spoiler |
| Removing: |
| – | Unclip the bumper with a screwdriver (from the bumper reverse side). |
| – | Slide spoiler forwards. |
| Installing: |
| – | Clip spoiler into the bumper. |
| 8 - | 1.5 Nm |
| 9 - | Right cover part |
| Removing: |
| – | Carefully lever off cover part e.g. with disassembly wedge -3409-. |
| Installing: |
| – | Lock cover part into position in the bumper. |
| 10 - | 3.5 Nm |
| 11 - | Right cap |
| 12 - | Left cap |
